skip to main |
skip to sidebar
In this Blogger tutorial I expand on my previous article about how to add a 3-4 column footer to Blogger by showing you how add border styling to the new footer. You will learn how to add a border around all of your footer columns or around only part of the footer columns. You will also learn how to add different border styles and border colors to customize your 3-4 column footer.
If you have just landed here and need instructions on how to add a 3 or 4 column footer to your Blogger blog then please refer to how to add a 3 or 4 column footer to a Blogger template (Blogspot template)
This is a walkthrough designed to assist bloggers with no experience of CSS styling who want to enhance their Blogger template with borders and other CSS styling. By following these examples you will gain the knowledge you need to make many types of custom changes to the borders of your new Blogger footer. For help with changing the background of your blogger footer please see my article How to Change the Background a Blogger Footer.
How to Add Borders to the Footer of a Blogger Template
To add lines (commonly known as borders) to a Blogger template footer we need to add some CSS styling.
Before beginning to add borders there are 3 values to consider:
- width of the border (line thickness eg 1px, 2px, 3px and so on)
- line style of the border (solid, dotted, dashed, double)
- color of the border (hex color)
- How to Add a Border Around the Outside of a Blogger Footer
First we add the border property and then add the border style, border width and the border color values. In these following examples just by changing these values we can achieve lots of different results.
- To Add a Dashed Border Around the Outside of a Blogger Footer
With the following code a dashed black line 1px thick will be added around the outside of the footer.
#footer-columns {
margin:0 auto;
clear:both;
}
Change to:
#footer-columns {
border: 1px dashed #000000;
clear:both;
margin:0 auto;
}

- To Add a Dotted Border Around the Outside of a Blogger Footer
By changing the dashed black line to a dotted border it is simple to get a different line style.
#footer-columns {
clear:both;
margin:0 auto;
}
Change to:
#footer-columns {
border: 1px dotted #000000;
clear:both;
margin:0 auto;
}

- To Add a Solid Border (Blue 3px thick) Around the Outside of a Blogger Footer
To add extra emphasis we can change the line color and its thickness. Here I have made the line blue rather than black and thickened it from 1px to 3px.
#footer-columns {
clear:both;
margin:0 auto;
}
Change to:
#footer-columns {
border: 3px solid #336699;
clear:both;
margin:0 auto;
}

- To Add a Partial Border to a Blogger Footer
Sometimes we might want to add a border to only one part of the footer area rather than the whole thing. Again we add theborder property but we append it with the following values: (top, bottom, left, right) depending on where we want to place the border.
- To Add a Solid Border to the Top of a Blogger Footer
#footer-columns {
clear:both;
margin:0 auto;
}
Change to:
#footer-columns {
border-top: 1px solid #000000;
clear:both;
margin:0 auto;
}

- To Add a Solid Border to the Bottom of a Blogger Footer
#footer-columns {
clear:both;
margin:0 auto;
}
Change to:
#footer-columns {
border-bottom: 1px solid #000000;
clear:both;
margin:0 auto;
}
- To Add a Dashed Border to the Top of a Blogger Footer
#footer-columns {
clear:both;
margin:0 auto;
}
Change to:
#footer-columns {
border-top: 1px dashed #000000;
clear:both;
margin:0 auto;
}
- To Add a Dotted Border to Both Top and Bottom of a Blogger Footer
#footer-columns {
clear:both;
margin:0 auto;
}
Change to:
#footer-columns {
border-top: 1px dotted #000000;
border-bottom: 1px dotted #000000;
clear:both;
margin:0 auto;
}
- To Add a Dotted Border 4px thick to Both Top and Bottom of a Blogger Footer
#footer-columns {
clear:both;
margin:0 auto;
}
Change to:
#footer-columns {
border-top: 4px dotted #000000;
border-bottom: 4px dotted #000000;
clear:both;
margin:0 auto;
}

- To Add a Blue Solid Border 5px thick to Both Top and Bottom of a Blogger Footer
#footer-columns {
clear:both;
margin:0 auto;
}
Change to:
#footer-columns {
border-top: 5px solid #336699;
border-bottom: 5px solid #336699;
clear:both;
margin:0 auto;
}

In this Blogger tutorial (Blogspot tutorial) I have shown you how to make some simple customizations to the borders of a Blogger footer. This tutorial is intended as an extension of my earlier tutorial on adding a three or four column footer to Blogger. However it is also suitable if you are using a custom template and want to enhance the footer styling further. You have learned how to add borders to a Blogger footer and change the position, color, width and styling.
If you want to know more about CSS styling I will be publishing further articles in the future. Look out for my next article in this series How to Add Backgrounds to a Blogger Footer.
In this Blogger tutorial (Blogspot tutorial) I show you how to add a quick edit wrench to Blogger if it is missing from a Blogger gadget. Check here to find a solution for a missing quick edit pencil not showing in Blogger
The quick edit feature allows you to edit a Blogger gadget directly from the blog itself rather than having to go through the Design > Page Elements screens and then finding the actual widget itself before you can edit it.
Heaps of times I have downloaded custom Blogger templates only to find that there are lots of omissions compared to a default Blogger template. If you are using a custom Blogger template with the quick edit feature missing here is a step by step guide to insert the missing quick edit feature into your Blogger template
The quick edit can be missing from anywhere in your Blogger template. I have chosen to use the sidebar for this tutorial but the solution works wherever the quick edit feature has been removed or never inserted in the first place.
Tutorial Difficulty rating: Easy
Time: Less than 5 minutes
Suitable for all levels of Blogger expertise
How to Add the Quick Edit Wrench to a Blogger Gadget
- Login to Blogger
- Go to Design > Edit HTML
- Check the Expand Widget Templates box
- Using CTRL + F buttons together bring up the search box
- Enter the following search term
</b:includable>
- Scroll through your Blogger template. You will see that every instance of </b:includable> is highlighted in yellow.
- Once you come to the sidebar widgets which is the most likely place for the quick edit to be missing from look for something like the following (this will vary from template to template). This is the start of the first sidebar if you had a template with a two column sidebar
<b:section class='sidebar' id='sidebar1' preferred='yes'>
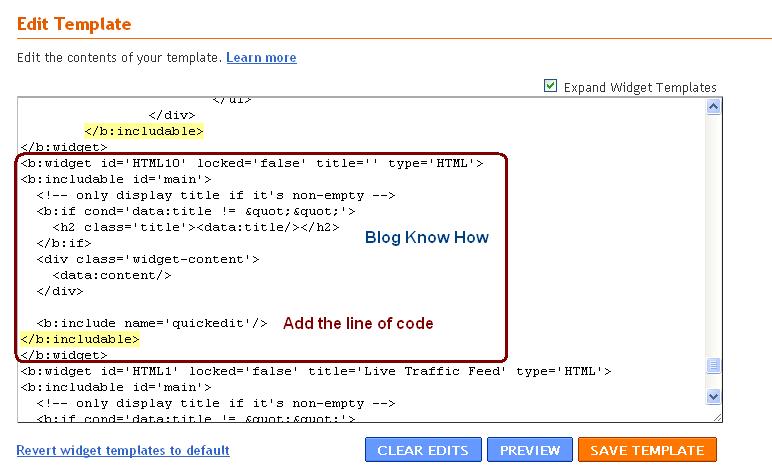
- Now look at the picture below. You can see that this is the code for a Javascript/HTML widget as shown in red

- Just identify the widget that has the missing quick edit feature and add the following line of code immediately before the </b:includable>
<b:include name='quickedit'/>
- Use the Preview button to check your changes before committing to them
- Don't forget to click on Save Template
In this Blogger tutorial (Blogspot tutorial) you have learned how to fix a missing quick edit button often missing from custom Blogger templates. No matter where the quick edit button has been omitted (sidebar, footer, header etc) it can be added in to a Blogger template very easily so that a Blogger gadget can be edited without having to go through the Blogger design screen
Is your custom Blogger template missing its quick edit pencil at the bottom of your Blogger posts (Blogspot posts)? Don't worry. In this Blogger tutorial I discuss how to show a quick edit pencil icon beneath Blogger posts if it is missing. This is a common Blogger problem among custom Blogger templates but fortunately it only takes a couple of minutes to fix.
This Blogger tutorial follows on from my previous Blogspot tutorial about fixing missing Blogger icons. Check out how to show quick edit gadget wrench in Blogger (Blogspot) for help with this issue.
In my previous Blogger tutorials I have also discussed how to fix many other common Blogger problems eg how to fix a missing embedded comment form in Blogger. Take a look at all my Blogger tutorials onhow to fix common Blogger problems (Blogspot problems) here
Fix Missing Quick Edit Pencil Blogger Blogspot
The quick edit pencil is a nice Blogger feature that you would not want to be without. A click on this time saving Blogger icon gives you direct access to your Blogger posts without having to go through "Edit Posts"
So if the free custom Blogger template you downloaded from theinternet has no quick edit pencil displaying under your Blogger posts when viewing the actual published post then it can be fixed by taking the following the steps below:
- Login to Blogger
- Go to your Design > Page Elements
- Click on the Blog Posts edit button located in the bottom right hand corner of the widget

- A Configure Blog Posts window will pop up displaying a number of different features that can be turned on and off on your blog posts.
- Make sure that Show Quick Edit is checked. Tick the box and save if Show Quick Edit is not already checked

- Now navigate to an actual published post and check whether the quick edit pencil is now displaying in or around the footer of your blog post. Remember that you must be logged into Blogger to see the quick edit pencil - it is not displayed to your visitors
If the pencil is there then that is the end of this Blogger tutorial. The pencil just needed to be enabled. So thank you for joining me today and if you have any other issues with Blogger be sure to check out my how to fix common problems in Blogger tutorials or take a look at the list of all the Blog Know How Blogger tutorials
If the Blogger quick edit pencil is still missing it means that some important code has been omitted from your Blogger template and it will need to be added to get the quick edit pencil to show up
- Go to Design > Edit HTML
- Back up your template
- Check the Expand Widget Templates box by placing a tick in it
- Find the following line of code by holding down the CTRL key and F at the same time:
<b:includable id='postQuickEdit' var='post'>
- Check whether the following code is under it:
<span class='post-icons'>
<!-- email post links -->
<b:if cond='data:post.emailPostUrl'>
<span class='item-action'>
<a expr:href='data:post.emailPostUrl' expr:title='data:top.emailPostMsg'>
<img alt='' class='icon-action' height='13' src='http://img1.blogblog.com/img/icon18_email.gif' width='18'/>
</a>
</span>
</b:if>

<!-- quickedit pencil -->
<b:include data='post' name='postQuickEdit'/>
</span> </div>
- If part or all of the code is missing copy and paste it above :
<!-- quickedit pencil -->
<b:include data='post' name='postQuickEdit'/>
- Save changes to your Blogger template
- Go to an individual published post page and see your new quick edit pencil displayed under your Blogger post
Tips and Troubleshooting
If you want to change the Blogger quick pencil icon you can by changing the image. Simply replace the image as depicted in red with the URL address of your own image. If your image is a different size you may have to change the width and height as shown in blue for the image to display correctly
<span class='post-icons'>
<!-- email post links -->
<b:if cond='data:post.emailPostUrl'>
<span class='item-action'>
<a expr:href='data:post.emailPostUrl' expr:title='data:top.emailPostMsg'>
<img alt='' class='icon-action' height='13' src='http://img1.blogblog.com/img/icon18_email.gif' width='18'/>
</a>
</span>
</b:if>

<!-- quickedit pencil -->
<b:include data='post' name='postQuickEdit'/>
</span> </div>
In this Blogger tutorial (Blogspot tutorial) I have shown you how to fix a missing Blogger quick edit pencil that is not showing. I have demonstrated how to enable the quick edit pencil in Blogger via Page Elements and I have provided you with the missing code in the event that the quick edit pencil code is missing from your custom Blogger template.
Please let me know if this tutorial has been useful for you by leaving your comments and opinions below.