Pages

Powered by Blogger.
Showing posts with label Customise Blogger. Show all posts

How to Add a Subtitle to Blogger Posts

Monday, July 07, 2014

This Blogger tutorial shows you how to easily and quickly add a subtitle to your Blogger posts (Blogspot posts) so that both search engines and readers will have more information about your post. I also discuss the benefits of adding subtitles to Blogger articles. This is an easy tweak to your Blogger blog that anyone can carry out in a couple of minutes.

blogger Blog with Subtitle Under Post for Emphasis and Search Engine Friendliness

Benefits of Using Subtitles in Posts
Adding a subtitle which appears below the title of your post can be both eye catching and informative. For instance a titling schema for this post could be:

Title: Add a Subtitle to a Blogger Blog

Subtitle: Make Your Posts More Search Engine Friendly and User Friendly

If you craft your titles and subtitles carefully you will encourage more targeted readers of your blog as they will be able to see at a glance what your post is about rather than reading the whole article. Your traffic therefore might be slightly less but they will be far more targeted to the content of your site resulting in a lower bounce rate.

If the subtitle you choose for your Blogger post is keyword rich then you are also improving your chances of gaining a higher position in search engine result pages because search engines give added weight to headings and to text early on in an article. By adding a subtitle to a Blogger post you have a SEO tool which if used effectively could result in more visitors finding your site because of higher keyword density.

You can of course add a subtitle manually to each post and format it everytime. The advantage of this method over doing it manually though is that all the formatting is in the stylesheet section of your template so you only have to change the colour scheme and font variables in one location and Blogger will look after the rest. Any change will be reflected in each and every post that has the subtitle <div> tags.


How to Add a Subtitle to Blogger Posts
This tutorial guides you through the steps to take to add a subtitle to your Blogger blog. The trick requires only takes a few short minutes and requires only a small snippet of code to be added to your template. Provided the instructions are followed anyone can do this including beginners and new bloggers. Interestingly it is not widely known or written about in technical blogs that a subtitle can be added to your Blogger Blogspot blog posts yet the advantages are considerable.

1. Log in to Blogger and navigate to Design > Edit HTML

2. Find the </b:skin> tag in your template. If you are have difficulty finding it use CTRL + F to bring up the Blogger toolbar at the bottom of your blog and enter the tag </b:skin> into the search box on the toolbar

3. Copy and paste the code below into your template making sure that it appears before the </b:skin> closing tag.

.subtitle{
font-family:Trebuchet MS',Verdana,Arial,Sans-serif;
font-size:15px;
color: #ca1717;
line-height:20px;
}

Add a Subtitle to a Blogger post - edit template and customise if desired

Update November 14, 2010. This code inserts a subtitle in red. You will need to change this color to match your template. See later in this post for information on how to add styling or change the color of the subtitle. If you wish to use a known variable as shown in the above image you can. color: $dateheadercolor; could be used for example provided this variable had already been declared in the variables section of the template.

4. Save Template

5. Go to the post you wish to add a subtitle to by clicking on the Posting tab and then the Edit Posts link.

6. Copy and paste the following code into your post ahead of any other text.

<div class="subtitle">Subtitle Text. Please Substitute for your own text</div>

Add a Subtitle to a Blogger Post

7. Substitute your own text between the <div> tags

8. Navigate to Settings > Formatting and under the last option Post Template enter the following into the box:

<div class="subtitle"></div>

This will mean that every time you create a post you will have the tags appear automatically. All you need do is place the text of your subtitle between the tags. If you don't want to use a subtitle for a particular post just delete the tags.

9. Save Changes to Post and click on View Blog to admire your new subtitle.

blogger Blog with Subtitle Under Post for Emphasis and Search Engine Friendliness

Customizing the CSS Styling of a Blogger Subtitle
It is easy to customize your subtitle for a different font type, color and size. Just change the code you added before the </b:skin> tag. If you want a specific color for instance you could change the color I have chosen for another color, increase the font size, and change the font face to Times Roman for instance. Thus your code would become something like this:


.subtitle{

font-family:Georgia, "Times New Roman", Times, serif;
font-size:16px;
color:#ff6600;
line-height:20px;


This Blogger tutorial has shown you how to add a subtitle to your Blogger posts (Blogspot posts) quickly and easily. I have discussed the benefits of inserting a subtitle feature on a Blogger blog including how this might assist search engines to correctly index your blog articles. I have also shown you how to customize your subtitle to your own individual requirements using CSS styling


Add Missing Embedded Comments Form to Blogger

Today I will show you how to fix your Blogger template if the embedded comments feature is missing or not working. I decided to write this article because I have noticed that the embed a comment below the post feature is often not working in many Blogger custom templates available for download. This is usually because many of these templates were released prior to Blogger enabling embedded comments.

If you have downloaded a custom template that has embed a comment missing then read on as I will show you how to insert the code for embed a comment form into your template. Inserting code into a blog template can be challenging for some but if you follow these instructions it is not beyond even virtual beginners.

1. Login to Blogger if you are not already logged in

2. Navigate to Settings > Comments. Under Comment Form Placement make sure the Embedded below Post radio button is set. Save any changes you make.

In Blogger Settings Comments Set Comments to Embedded

3. Navigate to Layout > Edit HTML

4. I strongly recommend you back up your template by downloading it to your computer before proceeding

4. Check Expand Widget Templates

5. Use CTRL + F to bring up the Blogger Toolbar

6. Look for the following code block by entering <span class='paging-control-container'> into the find box on the toolbar. Note if you don't have this code look at the alternative option below #7 in this post

<b:if cond='data:post.commentPagingRequired'>
<span class='paging-control-container'>
<a expr:class='data:post.oldLinkClass' expr:href='data:post.oldestLinkUrl'>
<data:post.oldestLinkText/>
</a>
<a expr:class='data:post.oldLinkClass' expr:href='data:post.olderLinkUrl'>
<data:post.olderLinkText/>
</a>

<data:post.commentRangeText/>

<a expr:class='data:post.newLinkClass' expr:href='data:post.newerLinkUrl'>
<data:post.newerLinkText/>
</a>
<a expr:class='data:post.newLinkClass' expr:href='data:post.newestLinkUrl'>
<data:post.newestLinkText/>
</a>
</span>
</b:if>


7. Paste the following code into your template immediately after the code block above and before this line of code <div id='backlinks-container'>

<p class='comment-footer'>
<b:if cond='data:post.embedCommentForm'>
<b:if cond='data:post.allowNewComments'>
<b:include data='post' name='comment-form'/>
<b:else/>
<data:post.noNewCommentsText/>
</b:if>
<b:else/>
<b:if cond='data:post.allowComments'>
<a expr:href='data:post.addCommentUrl' expr:onclick='data:post.addCommentOnclick'><data:postCommentMsg/></a>
</b:if>
</b:if>
</p>
</b:if>

Enter the Embed Comments Form into Blogger Template
Alternative Option
If you don't have the code as mentioned in #6 you will likely have the following:

<p class='comment-footer'>
<b:if cond='data:post.allowComments'>
<a expr:href='data:post.addCommentUrl' expr:onclick='data:post.addCommentOnclick'><data:postCommentMsg/></a> </p>
</b:if>

In which case replace with this code:

<p class='comment-footer'>
<b:if cond='data:post.embedCommentForm'>
<b:if cond='data:post.allowNewComments'>
<b:include data='post' name='comment-form'/>
<b:else/>
<data:post.noNewCommentsText/>
</b:if>
<b:else/>
<b:if cond='data:post.allowComments'>
<a expr:href='data:post.addCommentUrl' expr:onclick='data:post.addCommentOnclick'><data:postCommentMsg/></a>
</b:if>
</b:if>
</p>
</b:if>

8. Click on the Save Template button to save your template changes

9. Click on the View Blog link and test your embed comment feature by clicking on the number of comments link found at the bottom of each post. Notice that the post will now be displayed along with the embed a comment form below the post


Troubleshooting
As there are many variations amongst templates neither of these options may work in which case try this solution from Blogger Buster:

Find: <b:include data='post' name='comments' />

Immediately below this line add the following line:
<b:include data='post' name='comment-form'/>


In this tutorial I have shown you how to add the embed comments form into your custom Blogger template if it is missing so that visitors can comment easily.

Show Date Above Blogger Post Title

Sometimes you may download a Blogger Blogspot template which does not display the date header above the post title. I recently struck a free Blogger template like this and it took some time to find the right part of the template to fix the date. Plus the answer was not as far as I could tell listed in Blogger help. So to help anyone desperately struggling to find the solution to this problem I have decided to share this information in this article.


To Display the Date Header Above Post Title

1. Log in to Blogger

2. Go to Layout > Edit HTML

3. Back up your template before attempting any changes

4. Type the following into the search box (CTRL + F) to find the block of code beginning with this line:

<data:adStart/>

5. Paste the following lines of code

<b:if cond='data:post.dateHeader'>
<h2 class='date-header'><data:post.dateHeader/></h2>
</b:if>

into the code block as shown here:

<data:adStart/>
<b:loop values='data:posts' var='post'>
<b:if cond='data:post.dateHeader'>
<h2 class='date-header'><data:post.dateHeader/></h2>
</b:if>

<b:include data='post' name='post'/>
<b:if cond='data:blog.pageType == "item"'>
<b:include data='post' name='comments'/>
</b:if>
<b:if cond='data:post.includeAd'>
<data:adEnd/>
<data:adCode/>
<data:adStart/>
</b:if>
<b:if cond='data:post.trackLatency'>
<data:post.latencyJs/>
</b:if>
</b:loop>
<data:adEnd/>
</div>

7. Click the Save Template button

8. View Blog to see the date above the header


Today's Blogger Blogspot tip has shown you how to add the date above the post title on a Blogger Blogspot blog. The date above the post is often missing among slightly older Blogger templates but thankfully the fix is fairly easy.

Add 3 Column or 4 Column Footer to Blogger

In this Blogspot tutorial you will learn how to convert your existing Blogger footer (Blogspot footer) into a 3 column footer or a 4 column footer. With more columns in your Blogger footer you will be have the extra room to accommodate more widgets such as Flickr photos and Twitter updates. Also you will be able to put less frequently used widgets such as recents comments, archives, followers, About Me etc at the bottom of your template so that only the most important widgets are loaded first.

This tweak involves adding code to the footer section of your existing Blogger template to change it to 3 columns or 4 columns. The tutorial is not beyond the capabilities of Blogger newbies and webmasters with intermediate skills but care needs to be taken when modifying your Blogger template so back up before you start. For best results a Blogger template with a width of around 900px is best.

Convert your Blogger footer to a 3 column footer

How to Add a 3 Column Footer to Blogger

  1. Log in to Blogger if not already logged in
  2. Navigate to Layout > Page Elements
  3. Move any existing widgets out of the footer section and place them in the sidebar temporarily and save changes
  4. Navigate to Layout > Edit HTML
  5. Back up your template as a precaution by downloading it to your computer
  6. Find the following section in your Blogger template

    <div id='footer-wrapper'>
    <b:section class='footer' id='footer'/>
    </div>

    If you are having difficulty finding this section trying searching for footer-wrap or something similar as sometimes this section is called something else in some templates.
  7. To Add a 3 Column Footer to Blogger
    Replace all the code located in Step 6 with the following

    <div id='footer-columns'>
    <div id='footer1' style='width: 30%; float: left; margin:0; text-align: left;'>
    <b:section class='footer-column' id='col1' preferred='yes' style='float:left;'/>
    </div>
    <div id='footer2' style='width: 40%; float: left; margin:0; text-align: left;'>
    <b:section class='footer-column' id='col2' preferred='yes' style='float:left;'/>
    </div>
    <div id='footer3' style='width: 30%; float: right; margin:0; text-align: left;'>
    <b:section class='footer-column' id='col3' preferred='yes' style='float:right;'/>
    </div>
    <div style='clear:both;'/>
    </div>

    To Add a 3 Column Footer to Blogger with a Lower Footer Section
    Replace all the code located in Step 6 with the following

    <div id='footer-columns'>
    <div id='footer1' style='width: 30%; float: left; margin:0; text-align: left;'>
    <b:section class='footer-column' id='col1' preferred='yes' style='float:left;'/>
    </div>
    <div id='footer2' style='width: 40%; float: left; margin:0; text-align: left;'>
    <b:section class='footer-column' id='col2' preferred='yes' style='float:left;'/>
    </div>
    <div id='footer3' style='width: 30%; float: right; margin:0; text-align: left;'>
    <b:section class='footer-column' id='col3' preferred='yes' style='float:right;'/>
    </div>
    <div style='clear:both;'/>
    <p/>
    <div id='footer-bottom' style='text-align: center; padding: 10px;'>
    <b:section class='footer' id='col-bottom' preferred='yes'>
    </b:section>
    </div>
    <div style='clear:both;'/>
    </div>

    Add 3 column footer to Blogger with a lower section
    To Add a 4 Column Footer to Blogger
    Replace all the code located in Step 6 with the following

    <div id='footer-columns'>
    <div id='footer1' style='width: 25%; float: left; margin:0; text-align: left;'>
    <b:section class='footer-column' id='col1' preferred='yes' style='float:left;'/>
    </div>
    <div id='footer2' style='width: 25%; float: left; margin:0; text-align: left;'>
    <b:section class='footer-column' id='col2' preferred='yes' style='float:left;'/>
    </div>
    <div id='footer3' style='width: 25%; float: left; margin:0; text-align: left;'>
    <b:section class='footer-column' id='col3' preferred='yes' style='float:left;'/>
    </div>
    <div id='footer4' style='width: 25%; float: right; margin:0; text-align: left;'>
    <b:section class='footer-column' id='col4' preferred='yes' style='float:right;'/>
    </div>
    <div style='clear:both;'/>
    </div>

    Convert Blogger Footer to a 4 Column Footer
  8. Save changes to your Blogger template.
  9. Navigate to Layout > Page Elements. You will now see a 3 column footer, 3 column footer with a lower section or a 4 column footer depending on what option you chose.
  10. Move the desired gadgets to the new Blogger footer columns. Create new widgets to fill up the footer columns if necessary. Save your changes.
  11. Click View Blog to admire your new footer section

Tips and Troubleshooting

  1. To Add Padding Between Footer Columns in Blogger
    To create some padding between the columns add the following code to the style section of your Blogger template - before </b:skin> tag.

    #footer-columns {
    clear:both;
    }

    .footer-column {
    padding: 10px;
    }
  2. To Add a Border to the 3 or 4 Column Blogger Footer

    • For Top Border Only of the 3 or 4 Column Footer
      Paste the following code before the </b:skin> tag

      #footer-columns{
      border-top:1px dotted $bordercolor;
      clear:both;
      margin:0 auto;
      }

      Replace $bordercolor with a hex color if default color is not displayed. Change this color to suit your template. For example


      #footer-columns{
      border-top:1px dotted #113355;
      clear:both;
      margin:0 auto;
      }
    • For a Box Border Around the 3 or 4 Column Footer

      #footer-columns{
      border:1px dotted $bordercolor;
      clear:both;
      margin:0 auto;
      }

      Replace $bordercolor with a hex color if default color is not displayed. Change this color to suit your template. For example

      #footer-columns{
      border-top:1px dotted #113355;
      clear:both;
      margin:0 auto;
      }


In today's Blogger tutorial you have learned how to add a 3 column footer or a 4 column footer to your Blogger template (Blogspot template). You have also learned how to add some styling such as a border above the footer and around the footer. As always I am available to answer questions if you need assistance. Good luck!

How to Align and Justify Blogger Posts

This is the second article in a series about CSS styling tricks and tips for Blogger written with Blogger beginners and novices in mind but suitable for all bloggers who want to customize their existing Blogger template. While the first article dealt with how to add or remove image borders in Blogger today I show you how to align and justify Blogger posts.
Skill Level: Beginner Rating: Easy Time: 1 Minute

Many of the questions that my readers ask me are about how to customize various features of their Blogger template (Blogspot template). Over the coming weeks I will be focusing on some simple CSS styling tricks and tips to help you get more out of your Blogger template. Much can be achieved by learning a little about CSS. So before you rush off to download a custom Blogger template consider customizing your existing Blogger template.

This tutorial is part of a series of articles that I will publishing over the coming weeks about customizing your Blogger template using CSS styling. I will be targeting beginner bloggers and newbies to Blogger as well as more seasoned bloggers so if you want to spice up your Blogger template please read along.

How to Justify Blogger Posts (Blogspot Posts) Using CSS
It is easy to change the text alignment of your Blogger posts with the addition of one extra line in the CSS styling section of your Blogger template (Blogspot template). By default the alignment is set to left align so that the text aligns to the left while the right edge is ragged. You can also have right alignment where the text aligns to the right and the left edge is ragged.

Another not so common option is to justify the text so that both left and right edges are straight. Users of MS Word and other word processing programs will be familiar with justify as an alignment choice. Justify stretches out the text so that each line has an equal width similar to what you will find in newspapers and magazines. I have found justifying my Blogger posts to be a useful feature on several of my blogs and thought some of you might to. Below are instructions on how to justify your Blogger posts so that all your blog's articles are justified but first take a look at the difference in presentation of these 2 blog posts just by justifying the alignment of the text. Makes a big difference don't you think?

Blogger post text is left aligned
Blogger post text is justified

  1. Before you start check how text is currently aligned on your Blogger posts. If it is left aligned you will be able to follow this trick to justify it. If it is already justified no need to go any further.
  2. Login to Blogger if not already logged in
  3. From the Dashboard click the Layout link for your blog and then click on Edit HTML
  4. Back up your template by downloading it in full as a precaution
  5. Use CTRL + F to find the code block beginning with .post in the CSS styling section of your Blogger template. As templates will differ greatly there are no hard and fast rules about what styling will be in this block. Here is a typical code block taken from the default Minima Blogger template

    .post {
    margin:.5em 0 1.5em;
    border-bottom:1px dotted $bordercolor;
    padding-bottom:1.5em;
    }
  6. Add the following line to the code block before the end brace (the end curly bracket)

    text-align:justify;

    so that your code now looks like:

    .post {
    margin:.5em 0 1.5em;
    border-bottom:1px dotted $bordercolor;
    padding-bottom:1.5em;
    text-align:justify;
    }
  7. Click on Save Template
  8. Click View Blog to see the alignment of all your posts has now changed to justified

Tips and Troubleshooting
  1. If your Blogger template justifies posts and you would like to left align them find the code beginning with .post in your Blogger template and add the following line to the block:

    text-align:left;

    so that your code now looks like:

    .post {
    margin:.5em 0 1.5em;
    border-bottom:1px dotted $bordercolor;
    padding-bottom:1.5em;
    text-align:left;
    }
  2. If you want the posts right aligned you would substitute the word right for left.

In this tutorial you have learned how to justify your Blogger posts to create a straight rather than ragged margin edge. By using this tip to add one line of code to your Blogger template you can enhance the look of your Blogger posts. This tweak only takes a minute but can markedly improve the presentation of your Blogger posts. Please keep reading along for more CSS tips and tweaks in the coming weeks.

Add or Change Background Image of a Blogger Template

In today's Blogger tutorial (Blogspot tutorial) I will show you how to both add a background image to a Blogger template if you don't have one already or change the existing background of your Blogger template.

I have chosen to write this article not because there aren't any how to articles already on the net but because they assume quite a bit of knowledge. I have taken a different tack with this post in that I assume you are an absolute beginner with no knowledge of Blogger templates.

For this reason I have provided some sample backgrounds for you to play around with. By just cutting and pasting these images you can see first hand how dramatically adding a different background to your Blogger template can change it. You will see that replacing your background image with these images isn't that difficult and hopefully it will give the confidence to branch out further and change the background of your Blogger template to suit your own needs. All that is needed is to insert a small snippet of code into the CSS styling section of your Blogger template and hey presto your Blogger template will take on a whole new look.

How to Change the Color of a Blogger Background (Default Templates)
If you are using a default Blogger template then you already have the option to change the background color to your own taste by going to Layout > Fonts and Colors. Some third party custom Blogger templates have this option too but by no means all. For instructions on changing the background color of custom templates see tips and troubleshooting below.

How to Add a Background Image to a Blogger Template
  1. Log in to Blogger if not already logged in
  2. Go to Layout > Edit HTML
  3. Back up your Blogger template as a precaution by downloading the full template to your computer
  4. Find the following line in your Blogger template

    body {
  5. Add the following line directly after this line
    background-image: url(URL address of your image);

    Your block of code will now look like this:

    body {
    background-image: url(URL address of your image);
    (existing code in this block)
    }
  6. Now replace the code in red for the URL address of your image. Choose an image from the selection below to practise with or use your own image. Note if using your own image make sure you read the tips and troubleshooting section below.


    https://blogger.googleusercontent.com/img/b/R29vZ2xl/AVvXsEgU6iB8pT-S8N3SDEicWIam_nveWMZihlr3BDExygjhdxy5o-tUNWFB3PgQOMWgZH1zAp9KJ8UPYYkQvoFVW8x0YB5Yl9mtr4Gk6FdcP1s2y_OnDYGp7WKXKvdIGYv2mIFykHJeya8Aftk/s320/background_047.gif


    https://blogger.googleusercontent.com/img/b/R29vZ2xl/AVvXsEhPgZxMqdpXyjgOWKIzEJgj2PTK9gFPGeUbRLg262t0SjuQ53NcR_7C2SSfsDtRrIF-7bKQ9kSoVs5mWJNRIJkzuIFCsP09SZmvUs1F2u6cGqeeF1H8BpCi0AAGTkZQLSZLep1eLlN0Cyo/s320/background_104.gif


    https://blogger.googleusercontent.com/img/b/R29vZ2xl/AVvXsEjmUE-6D_oTEaklbaruRVqKlGf4bvE3o5xzCXolZ_z94RIRzyk3JOeVzwGBlUAGcFkUldLnoUHEpg-8l9zhPafwKWYh_Z5Gbzeq5iKMvHxWFJjMicUq0k0lYna2q-9s-z7PNf8toOrLlWc/s320/background_126.gif


    https://blogger.googleusercontent.com/img/b/R29vZ2xl/AVvXsEgJ7OpSL4k6ExBw9Dwkm0c_SQB2Sv7-nkKWJKriFtEfPHEkvALxk2Bzn0yLn4VDkH2cAaNIWZyfkFcTpesVWLuTgI27H4LE2sZLALs-FchZ6eQ4ecrgatdcyei074XTHZX4vxeoHX_mfbI/s320/background_073.gif


    https://blogger.googleusercontent.com/img/b/R29vZ2xl/AVvXsEg6hxOGKGcUXn7QcvNoW9jOM7_aHsis9oFtKRHtUe0g1WCUgcvE7G8gZ7-GNAZxlMQO_kJBjT5Ie11Tb92RqA-OWjUXofyL96PFxpbjV6FIKNg0Uv4sI_QtxKK9oxrkWXpoBb2Q1RKyBmU/s320/background_083.gif

    Green Paws Background

    https://blogger.googleusercontent.com/img/b/R29vZ2xl/AVvXsEgpc6Dcb5aYegaLoY5NR_ghQaj-MLgyMs7mKGpmZtyMUh_KaMmnrA-Nhb3Ra3xVIUpncwOx3LKz22IVCx6u8SLzghzCpptJLAW4J2LC5v2b6q1bzcHZk4Xq6t0yqPkueObN5D1YuceRHUs/s320/green-paws.gif

    Musical Notes Background

    https://blogger.googleusercontent.com/img/b/R29vZ2xl/AVvXsEivVnAnrtr88eJjKp3uDNW4uQqSzTvi5InlWb4fgaLA3PsoGxmwsx9a6MwHILW1ShUcBY16ga44t0K_T_TLsKbFdpHmyiCUQdqBaWa9o0MYn0AZaSsTPiYZGEoKyCBLbkikq-ZmSrqKanI/s320/melody.gif
  7. Use the Preview button to see the effect of these different backgrounds on your template. It will help you get an idea of the kind of possibilities out there.
  8. You are welcome to use one of the above Blogger backgrounds as they are all free to use without any restriction. If you decide to use one of these simply click on Save Template and you are in business. Alternatively go ahead and find your own background image on the net and follow the instructions below to insert it into your Blogger template.

Tips and Troubleshooting

  • To Add Your Own Image to a Blogger Template
    There are huge number of backgrounds on the net that are suitable for Blogger. Search under free website backgrounds in your favorite search engine to find these.

    Simply download your preferred background and save to an image service like Photobucket, Flickr.

    Make sure the file format is either a .jpg, .gif or .png and that its size does not exceed 100kbs. As a rule of thumb an image size of around 30kb or less is about right if loading time speed is not to be compromised. Larger images can be resized quickly by using an online resizing service such as Shrink Pictures.

    Follow the instructions above to change the URL to that of your image.
  • To Change the Background Color of Your Custom Blogger Template
    If there is no option to change the background color of your Blogger template in Layout > Fonts and Colors you can still change the color manually.

    1. Follow steps 1 to 4 as above
    2. Find the line beginning with :

      background-color: #
    3. The hex color will be different for each template. We will change the color only

      background-color: #change hex color code to your chosen color;
    4. Replace the existing hex color code with the value of your chosen hex color. List of web safe hex colors. For example insert the following code to change the background color to:

      Denim Blue
      background-color: #336699;

      Black
      background-color: #000000;

      White
      background-color: #ffffff;
    5. Use the Preview button to see the effect of each color before you save it.
    6. Once you are satisfied go ahead and click on Save Template

Today's Blogger tutorial (Blogspot tutorial) aimed at Blogger beginners continues the series on CSS styling for Blogger. You have learned how to add the background image to your Blogger template or change the existing background image. To help you gain confidence in changing the background image I have provided some sample images for you to practise with. Also in this Blogger tutorial you have learned how to change the color of your Blogger background if you prefer a plain solid background color rather than a background image. As always if you strike any problems implementing the tips in this tutorial please let me know.

Add CSS Styling to Blockquotes in a Blogger Template

Today I continue the series of Blogger tutorials (Blogspot tutorials) by showing you how to apply CSS styling to blockquotes in a Blogger template. Other articles I have already published on the subject of CSS styling include:

How to Add, Delete or Remove Blogger Image Borders
How to Align and Justify Posts in Blogger
How to Add a Divider Between Blogger Posts
How to Add or Change a Background Image in a Blogger Template.

Today's tutorial on Blogger blockquotes will be useful if you are using a default Blogger template or a third party custom template. It will show you how to change your blockquote area in the following ways:

  • Add a background color to the blockquote
  • Add a border around the background of the blockquote
  • Add or change the color of the blockquote text
  • Add or change padding around the text
  • Add or change the margin
  • Add a background image

Blogger beginners you can relax as I have written this Blogger tutorial with you in mind. I will walk you through the steps of styling the blockquote section and you will see that it is not as daunting as it first appears. This Blogger tutorial assumes no knowledge of CSS styling. I have rated the difficulty level as easy to medium because it does involve making adjustments to your Blogger template.

How to Change the Blockquote Section of a Blogger Template

First of all let's take a look at the CSS Styling for the blockquote section of a default Minima Blogger template.

.post-body blockquote {
line-height:1.3em;
}

.post blockquote {
margin:1em 20px;
}

.post blockquote p {
margin:.75em 0;
}

As you can see the blockquotes area of this Minima template has minimal styling. Apart from line height and margin indentation there has been no additional code added to improve the look of the template.

Minima Blockquotes No Extra CSS Styling
Let's go ahead and give the blockquotes in your Blogger posts some styling. I will use the Minima template to show you but you can do the same for another default template or custom template. As always back up your Blogger template by downloading it to your computer before you begin to make any changes.

  1. CSS Styling to Add a Background Color to Blockquotes
    Adding a background color to the blockquote area can be achieved in 1 of 2 ways.

    1. One way is to enter the hex color directly into the styling as I have done below. This code will add a light grey background to the blockquote area.

      .post-body blockquote {
      line-height:1.3em;
      background-color: #cccccc;
      }
    2. Another way to add a background color using CSS styling for the blockquote area is to make use of the variable names already set up. The border color is light grey #cccccc by default in a Minima template. The advantage of this option is that if you decide to change the border color under Layout > Fonts and Colors the blockquote color will automatically change to the new color too.

      .post-body blockquote {
      line-height:1.3em;
      background-color: $bordercolor;
      }

      If you wanted the background color to be the same as the blog title color rather than the border color you would write this instead

      .post-body blockquote {
      line-height:1.3em;
      background-color: $titlecolor;
      }
  2. CSS Styling to Add a Border Around Blockquotes
    You have your background in place now let's add a narrow border around the background to add some more definition. The following will add a 1px solid border around the outside of your blockquote area in your Blogger posts.

    .post-body blockquote {
    line-height:1.3em;
    background-color: #cccccc;
    border: 1px solid #cc6600;
    }

    or if using variables

    .post-body blockquote {
    line-height:1.3em;
    background-color: $bordercolor;
    border: 1px solid $titlecolor;
    }

    Blockquotes With a Background and Background Border
  3. CSS Styling to Add Padding Around Blockquotes
    Now if we were to leave the styling at this point one of the problems would be that the text would butt up against the background which is not a good look. To create some space between the text and the background edge all the way around we use CSS styling to add some padding like this:

    .post-body blockquote {
    line-height:1.3em;
    background-color: #cccccc;
    border: 1px solid #cc6600;
    padding: 20 px;
    }

    or if using variables

    .post-body blockquote {
    line-height:1.3em;
    background-color: $bordercolor;
    border: 1px solid $titlecolor;
    padding: 20 px;
    }

    Blockquotes With a Background, Background Border and Padding
  4. CSS Styling to Add or Change the Text Color of Blockquotes
    If you want to accent your blockquote area in your posts one effective way to do this is to make the blockquote text color a different color from the text color of your pages. We do this by picking a color and adding the following line to the code:

    .post-body blockquote {
    line-height:1.3em;
    background-color: #cccccc;
    border: 1px solid #cc6600;
    padding: 20 px;
    color: #cc6600
    }

    or if using variables

    .post-body blockquote {
    line-height:1.3em;
    background-color: $bordercolor;
    border: 1px solid $titlecolor;
    padding: 20 px;
    color: $titlecolor;
    }

    Blockquotes With a Background, Background Border, Padding and Change of Text Color

Tips and Troubleshooting
If you want to add further modifications to the blockquotes area of your Blogger template here are several other possibilities.

  1. CSS Styling To Change the Margin of Blockquotes
    You can increase the margin from 1em to 1.5em by changing the margin line to
    margin: 1.5em 20px;
  2. CSS Styling to Add a Background Image to Blockquotes
    You can have your own image as a background in your blockquotes area of your posts by adding this line:

    background: url(http://URL of your image.jpg);

In today's Blogger tutorial (Blogspot tutorial) you have learned how to add CSS styling to the blockquotes area of your Blogger posts. I have shown you how to add a background, a background border, change the text color, add padding, change the margin and add a background image to the blockquotes code block. If you have a moment please let me know how you got on customizing your own Blogger template. Any questions please ask.


Add Profile Images to Blogger Comments

Today I will show you how easy it is to have Blogger (Blogspot) display profile images in the embedded comments section of your blog even if you are using a custom template.

About a month ago Blogger announced that it was enabling profile images (profile avatars) in the embedded comments section on Blogger (Blogspot) as part of its 10th birthday feature series. The new profile image feature which has been available on other commenting options has now been extended to the embedded comments option. This is good news if you are using a default template as you will now see a small avatar next to your visitors comments and your own avatar if you have uploaded a profile image.


Default Blogger Templates - Enabling Profile Images
Profile images work on default Blogger templates and have been automatically enabled by Blogger. If you are using a default Blogger template with embedded comments enabled and have recent comments on a post you will see a profile image to the left of visitor comments (provided they have uploaded one that is). Your profile avatar will also display when you respond to visitor comments again provided you have uploaded one. (To upload your profile photo click on Add Photo at the Dashboard). If profile images are not displayed enable them by going to Settings > Comments and checking the Yes radio button at the bottom of the page which says Profile Images Enabled.

Custom Blogger Templates - Enabling Profile Images
If you are using a custom template you may still be able to see profile images in your embedded comments section. Check out Settings > Comments to make sure Profile Images are enabled. If you can't see profile images you can still add this feature by tweaking your Blogger template. Follow the instructions below to have Blogger display profile images in the embedded comments section of your custom Blogger template.

Add Profile Images to Comments Section of a Custom Blogger Template
If you are using a custom Blogger template you can use the following method to add profile images to the embedded comments section of your Blogger template.

  1. Login to Blogger if not already logged in
  2. Go to Design > Edit HTML
  3. Back up your Blogger template as a precaution by downloading the full template to your computer
  4. Expand Widget Templates by checking the box on the right hand side
  5. Find the following line in your Blogger template by using CTRL + F:

    <dl id='comments-block'>
  6. Change the above line to the following:

    <dl expr:class='data:post.avatarIndentClass' id='comments-block'>
  7. Scroll down a few lines and find the following line in your Blogger template:

    <a expr:name='data:comment.anchorName'/>
  8. Directly before the above line paste the following code block:

    <b:if cond='data:comment.favicon'>
    <img expr:src='data:comment.favicon' height='35px' style='margin-bottom:-2px;' width='35px'/>
    </b:if>
    <a expr:name='data:comment.anchorName'/>
    <b:if cond='data:blog.enabledCommentProfileImages'>
    <data:comment.authorAvatarImage/>
    </b:if>
  9. Click Save Template
  10. Click View Blog and navigate to a page with commenting to see avatars next to comments in the embedded comments area


Tips and Troubleshooting
  • If you have added the author commenting highlight hack to your Blogger template there will be 2 instances of the code at Step 7 to change
  • If your template does not have the code mentioned in Step 5 and Step 6 check that dl has not be replaced by div. In this case leave the div as is and replace the rest of the code in the line.
  • Blogger has only enabled profile images for Blogger and Google profiles so if your visitors comment using identities such as "Anonymous" or "Name/URL" their image profile will not be displayed. If OpenID, AIM or other identities are used these favicons will be displayed instead.
  • Profile avatars load last so they will not prevent visitors viewing your content if you have a lot of comments on some pages


In today's Blogger tutorial (Blogspot tutorial) you have learned how to enable profile images in the embedded comments section in Blogger. If you are using a default Blogger template this can be achieved by enabling profile avatars in your Blogger template. If you are using a third party custom template I have shown you a Blogger hack that will display profile images next to comments on your blog. As always I am interested in how you get on with this tweak. Good luck!

Remove Image Border in Default Blogger Templates Simple and Awesome Inc

In this Blogger tutorial I show you how to remove the border around images in Blogger posts (Blogspot posts) when using one of the latest default Blogger templates Simple or Awesome Inc.

If you are using an older generation Blogger template or a custom template the solutions contained in this article may work for you however it is more likely that you will need to follow the methods to remove image borders outlined in my previous Blogger tutorial Change or Remove Blogger Image Borders (Part 1)

Below I explore two methods of removing or deleting image borders in the Blogger template Simple. The first method shows you how to remove the image border using Template Designer and the second method outlined describes how to remove the image border manually by changing the code.


Method 1 - Use Template Designer to Remove Image Border in Blogger
  1. From the Blogger Dashboard go to Design > Template Designer
  2. Then select Advanced > Images
  3. Under Border Color use the drop down arrow to open the color palette
  4. Change the setting to transparent by checking the small box on the bottom right hand side marked "transparent"

    How to change the image border to transparent in Blogger
    Note: If you are using the black version of the Awesome Inc template you will need to change the Background Color to transparent too. Click on the down arrow of the color palette and select transparent.

    Remove border Awesome Inc Blogger template
  5. Click Apply to Blog to save your changes to the template
  6. Navigate to any post page to view images in posts without the border


Method 2 - Change Template Code to Manually Remove Image Border from the New Default Blogger Templates
  1. From the Blogger Dashboard go to Design > Edit HTML
  2. Back up your Blogger template
  3. Find this line amongst the declared variables at the top of your template

    <Variable name="image.border.color" description="Border Color" type="color" default="transparent" value="#cccccc"/>
  4. Change to the value of the border color to transparent like so

    <Variable name="image.border.color" description="Border Color" type="color" default="transparent" value="transparent"/>
  5. Save your changes to the template
  6. Navigate to any post page that has an image and see that the border around the image is no longer visible


In this Blogger tutorial (Blogspot tutorial) I have shown you how to remove or delete the border around images in Blogger posts for the newest generation of default Blogger templates Simple and Awesome Inc. I have discussed two different methods to remove the border around the images either by adjusting the settings in the Blogger Template Designer or by manually changing the code of the variable in the CSS styling section of the default Blogger template

How to Change Bullet Point Style in Blogger (Blogspot) Lists

In Part 1 of this three part series of Blogger tutorials I discuss how to change bullet point styles of lists you may want to include in Blogger posts. This first Blogger tutorial deals with unordered lists and how these can be styled using CSS in Blogger (Blogspot). The second part of these tutorials will deal with ordered lists while part 3 discusses bullet point changes you can make to your sidebar, footer and menus.

Today you will learn how to:
  • change the style of bullet points in unordered lists
  • add bullet points to unordered lists if they are absent
  • add an image instead of a bullet to lists in your Blogger posts

This tutorial is rated easy and is designed so that even Blogger newbies can make the changes they want to their Blogger template. Changing the bullet point style involves changing the CSS styling in your Blogger template (Blogspot template). Join me as I walk you through this step by step guide.

How to Add Bullet Points to a Blogger Post
If you are still using the old Blogger editor you will need to add bullet points manually to any unordered lists you create in Blogger posts. If you are using the new editor the work is done for you. Either way though this is the type of code that generates unordered lists:
<ul><li>Create your own list markers in Blogger</li>
<li>Create unordered lists in Blogger</li>
<li>Create bullet points in Blogger</li>
</ul>

Any text can be placed between the two <li></li> tags. Simply copy this list into a Blogger post and substitute your text for mine and you will have an unordered list.

Circular Bullet Points
Circular bullets (also known as markers or discs) are displayed in Blogger by default whenever unordered lists appear. This means that whenever the <ul></ul> tags are used in Blogger posts a leader dot or disc will appear before each line of text denoted by <li>. (Note I will discuss ordered lists <ol></ol> tags in part two of this tutorial).

An unordered list in a Blogger post using the <ul></ul> tags would appear like this:
  • Change Bullet Point Style in Blogger
  • Add Bullets to Blogger
  • Changing the look of unordered lists in Blogger


We can make lots of changes to the look of these filled discs or filled circles by changing the CSS styling in Blogger. For instance we can have squares, or we can choose to have no bullet point at all. Here's how.

To Add Square Bullet Points to Blogger (Blogspot)
The following code will replace the filled circle bullet points with squares instead:

  1. Login to Blogger if not already logged in
  2. From the Dashboard go to Design >Edit HTML
  3. Back up your template
  4. Find the posts section of your CSS stylesheet which will be before ]]></b:skin> tag
  5. For the following default Blogger templates eg "Simple" add the following CSS code to the post section like this

    .post ul li {
    list-style: square;
    }

  6. Save template and view blog post to see the circular bullet points have been replaced by square ones


To Add Circle Bullet Points to Blogger (Blogspot)
To add unfilled circle list markers or bullet points to Blogger posts do the following:

  1. Follow steps 1-4 as per square bullets
  2. Add the following code to the posts section of the CSS stylesheet of your Blogger template by entering the following code:

    .post ul li {
    list-style: circle;
    }

  3. Save the changes to your template and view a blog post to see the empty circle bullet points


How To Indent Bullet Points in Blogger
There are two ways to increase the indentation of list style markers or bullet points.

  1. Using the Inside or Outside Element
    The indentation of bullet points can be varied using the "inside" element. By default the list will be "outside" unless the "inside element" is used. The following code shifts the indentation of the list further to the right.

    .post ul li {
    list-style: circle inside;
    }


  2. Custom Indentation CSS Styling
    It is also possible to add custom indentation styling to lists. For instance here I have added a 2.5em indent using the following code to the circles example:

    .post ul li {
    list-style: circle;
    margin-left: 2.5em;
    }


How To Replace Bullet Points with an Image in Blogger (Blogspot)
Sometimes you may prefer to have an image list marker or icon instead of a bullet point. You will need to host your image somewhere such as a free image hosting service eg Flickr or Photo Bucket. Follow the steps below to replace bullet points in your Blogger posts with an image

  1. Follow steps 1-4 as per square bullets
  2. In the CSS styling of the posts section of your Blogger template and before the </head> insert the following code:
    .post ul li {
    list-style: url("http://URLaddressofImage.gif");
    }

  3. Replace URLaddressofImage with the URL address of the image you have uploaded to an image hosting service. Note in most cases the file will have a .gif extension. If the extension is anything other than .gif you will need to change this too.

  4. Save the changes to your Blogger template and navigate to a post page to see your image list marker installed


How to Remove the Bullet Points from Blogger Posts
If you are going for a minimalist look you may prefer to have no bullet points in the lists in your Blogger posts. In this case:

  1. Follow steps 1-4 as per square bullets
  2. In the CSS styling of the posts section of your Blogger template and before the </head> insert the following code:

    .post ul li {
    list-style: none;
    }


How to Add Missing Quick Edit Wrench to Blogger

In this Blogger tutorial (Blogspot tutorial) I show you how to add a quick edit wrench to Blogger if it is missing from a Blogger gadget. Check here to find a solution for a missing quick edit pencil not showing in Blogger

The quick edit feature allows you to edit a Blogger gadget directly from the blog itself rather than having to go through the Design > Page Elements screens and then finding the actual widget itself before you can edit it.

Heaps of times I have downloaded custom Blogger templates only to find that there are lots of omissions compared to a default Blogger template. If you are using a custom Blogger template with the quick edit feature missing here is a step by step guide to insert the missing quick edit feature into your Blogger template

The quick edit can be missing from anywhere in your Blogger template. I have chosen to use the sidebar for this tutorial but the solution works wherever the quick edit feature has been removed or never inserted in the first place.

Tutorial Difficulty rating: Easy
Time: Less than 5 minutes
Suitable for all levels of Blogger expertise

How to Add the Quick Edit Wrench to a Blogger Gadget

  1. Login to Blogger
  2. Go to Design > Edit HTML
  3. Check the Expand Widget Templates box
  4. Using CTRL + F buttons together bring up the search box
  5. Enter the following search term

    </b:includable>

  6. Scroll through your Blogger template. You will see that every instance of </b:includable> is highlighted in yellow.
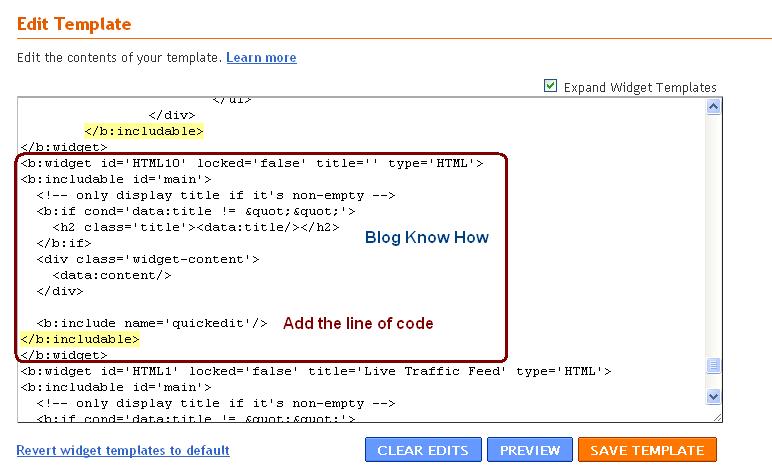
  7. Once you come to the sidebar widgets which is the most likely place for the quick edit to be missing from look for something like the following (this will vary from template to template). This is the start of the first sidebar if you had a template with a two column sidebar

    <b:section class='sidebar' id='sidebar1' preferred='yes'>
  8. Now look at the picture below. You can see that this is the code for a Javascript/HTML widget as shown in red


  9. Just identify the widget that has the missing quick edit feature and add the following line of code immediately before the </b:includable>

    <b:include name='quickedit'/>


  10. Use the Preview button to check your changes before committing to them
  11. Don't forget to click on Save Template

In this Blogger tutorial (Blogspot tutorial) you have learned how to fix a missing quick edit button often missing from custom Blogger templates. No matter where the quick edit button has been omitted (sidebar, footer, header etc) it can be added in to a Blogger template very easily so that a Blogger gadget can be edited without having to go through the Blogger design screen.

How to Fix Missing Quick Edit Pencil in Blogger Blogspot

Is your custom Blogger template missing its quick edit pencil at the bottom of your Blogger posts (Blogspot posts)? Don't worry. In this Blogger tutorial I discuss how to show a quick edit pencil icon beneath Blogger posts if it is missing. This is a common Blogger problem among custom Blogger templates but fortunately it only takes a couple of minutes to fix.

This Blogger tutorial follows on from my previous Blogspot tutorial about fixing missing Blogger icons. Check out how to show quick edit gadget wrench in Blogger (Blogspot) for help with this issue.

In my previous Blogger tutorials I have also discussed how to fix many other common Blogger problems eg how to fix a missing embedded comment form in Blogger. Take a look at all my Blogger tutorials on how to fix common Blogger problems (Blogspot problems) here

Fix Missing Quick Edit Pencil Blogger Blogspot
The quick edit pencil is a nice Blogger feature that you would not want to be without. A click on this time saving Blogger icon gives you direct access to your Blogger posts without having to go through "Edit Posts"

So if the free custom Blogger template you downloaded from the internet has no quick edit pencil displaying under your Blogger posts when viewing the actual published post then it can be fixed by taking the following the steps below:

  1. Login to Blogger
  2. Go to your Design > Page Elements
  3. Click on the Blog Posts edit button located in the bottom right hand corner of the widget

  4. A Configure Blog Posts window will pop up displaying a number of different features that can be turned on and off on your blog posts.
  5. Make sure that Show Quick Edit is checked. Tick the box and save if Show Quick Edit is not already checked


  6. Now navigate to an actual published post and check whether the quick edit pencil is now displaying in or around the footer of your blog post. Remember that you must be logged into Blogger to see the quick edit pencil - it is not displayed to your visitors

    If the pencil is there then that is the end of this Blogger tutorial. The pencil just needed to be enabled. So thank you for joining me today and if you have any other issues with Blogger be sure to check out my how to fix common problems in Blogger tutorials or take a look at the list of all the Blog Know How Blogger tutorials

    If the Blogger quick edit pencil is still missing it means that some important code has been omitted from your Blogger template and it will need to be added to get the quick edit pencil to show up
  7. Go to Design > Edit HTML
  8. Back up your template
  9. Check the Expand Widget Templates box by placing a tick in it
  10. Find the following line of code by holding down the CTRL key and F at the same time:

    <b:includable id='postQuickEdit' var='post'>

  11. Check whether the following code is under it:

    <span class='post-icons'>
    <!-- email post links -->
    <b:if cond='data:post.emailPostUrl'>
    <span class='item-action'>
    <a expr:href='data:post.emailPostUrl' expr:title='data:top.emailPostMsg'>
    <img alt='' class='icon-action' height='13' src='http://img1.blogblog.com/img/icon18_email.gif' width='18'/>
    </a>
    </span>
    </b:if>

    <!-- quickedit pencil -->
    <b:include data='post' name='postQuickEdit'/>
    </span> </div>
  12. If part or all of the code is missing copy and paste it above :

    <!-- quickedit pencil -->
    <b:include data='post' name='postQuickEdit'/>

  13. Save changes to your Blogger template
  14. Go to an individual published post page and see your new quick edit pencil displayed under your Blogger post


Tips and Troubleshooting
If you want to change the Blogger quick pencil icon you can by changing the image. Simply replace the image as depicted in red with the URL address of your own image. If your image is a different size you may have to change the width and height as shown in blue for the image to display correctly

<span class='post-icons'>
<!-- email post links -->
<b:if cond='data:post.emailPostUrl'>
<span class='item-action'>
<a expr:href='data:post.emailPostUrl' expr:title='data:top.emailPostMsg'>
<img alt='' class='icon-action' height='13' src='http://img1.blogblog.com/img/icon18_email.gif' width='18'/>
</a>
</span>
</b:if>

<!-- quickedit pencil -->
<b:include data='post' name='postQuickEdit'/>
</span> </div>


In this Blogger tutorial (Blogspot tutorial) I have shown you how to fix a missing Blogger quick edit pencil that is not showing. I have demonstrated how to enable the quick edit pencil in Blogger via Page Elements and I have provided you with the missing code in the event that the quick edit pencil code is missing from your custom Blogger template.

Please let me know if this tutorial has been useful for you by leaving your comments and opinions below.

Add Paypal Donate Button to Blogger

Friday, July 04, 2014

If you want to make a few bucks from all the hard work you are putting into your Blogger blog then consider adding a Paypal donate button to your Blogger blog (Blogspot blog).

Paypal Donate ButtonAdding a donation button will encourage all those happy readers to say a big thank you for helping them out. Not everyone will donate but you will get the odd generous soul who will willingly donate some chump change to shout you a coffee.

In this Blogger tutorial we will be adding a gadget to the Blogger sidebar or alternatively you could place it in the foooter of your Blogger template. We will be using a widget to contain our Paypal Donate Button and will not be changing your Blogger template. If you wish to place the donate button into your Blogger posts see the end of this Blogger tutorial for details.

Skill level is rated easy.

How to Add a Paypal Donate Button to Blogger (Sidebar or Footer Gadget)
Note: Updated on January 20 2012 to take account of new Paypal interface

1. Get yourself a Paypal account if you don't already have one

2. Login to your Paypal account

3. Click on the Merchant Services tab

Select Paypal Merchant Services Tab
4. Choose Donations from the list of key features displayed in the right sidebar of the PayPal Website Payments Standard Option (first of 3 payment solutions)
Note Paypal have changed its interface. You now need to select PayPal Website Payments Standard from Merchant Services drop down and then under the buttons in option 1 you will see in pretty tiny writing I must say "There are also buttons for donations and gift certificates." Click on donations.

Select Donations link in Paypal from Paypal Website Payments Standard Options 1 to add a donations button to Blogger Blogspot blog

5. From the Paypal Create a Donation Button screen choose Create Your Button Now link (one of two).


6. Stick with the default button unless you wish to customize it

7. Choose your currency depending on your needs and location

8. Choose Donors enter their own contribution amount radio button unless you want to have a set amount

Paypal Create Button Steps
9. Ensure the Secure Merchant ID radio button is selected. This will prevent spammers getting hold of your email address

10. At Step 2 it is worth saving your button

11. At Step 3 Customize your checkout page by allowing donors to write a short comment by selecting the Yes radio button to special instructions to seller

12. Select the No radio button for Customer's Shipping Address

13. Select the Create Button button

14. Once Paypal creates the donate button code copy it by right clicking your mouse and choosing copy

15. Logout of Paypal

16. Login to Blogger if you are not already logged in

17. Go to Design > Page Elements

18. Click on the Add a Gadget link in the sidebar

19. Choose HTML/Javascript widget from the list provided

20. Paste the button code into the Content box of the dialog box that appears by placing the mouse inside the box and right clicking the mouse and then paste

21. Select a title like "Shout Me a Coffee Today!" or whatever you would like

22. Click on the Save button

23. Drag and drop your new donation gadget into the spot you want it to appear in

24. Click the Save button to ensure your changes are saved

25. Click View Blog to see your new donate button in the sidebar of your Blogger blog

26. Click on your new donate button and you will be taken to the Paypal Checkout screen

Paypal Checkout screen

Tips and Troubleshooting

  1. To Add a Paypal Donate Button to Blogger Posts
    The following instructions will add a Paypal Donate button to all new Blogger posts. Note previous posts will not be changed. You will need to hard code the button into your Blogger template to have the Paypal Donate button added to every Blogger post. (Please ask if you need help with this)

    1. Follow the directions (steps 1-16) as above to get your Paypal button code
    2. In Blogger go to Settings > Formatting
    3. Paste the Paypal Donate Button code into the Post Template box
    4. Save changes
    5. Click on New Post to see that the code will be automatically inserted at the foot of each new post. (you will need to be in Edit Html mode to see the code)
  2. To Add a Paypal Donate Button to Individual Blogger Posts
    1. Follow the directions (steps 1-16) as above to get your Paypal button code
    2. In Blogger go to the post you wish to insert the button code into
    3. Insert the button code taking care to change all instances of double quotes to single quotes
    4. Save post and publish as normal. (If you have trouble with the preview post button in the old editor in Blogger click on compose and then edit html)


This Blogger tutorial has walked you through the steps needed to add a Paypal donate button to your Blogger blog (Blogspot blog) including how to configure your Paypal button at Paypal. I have covered adding the button as a sidebar gadget or footer gadget or alternatively added to Blogger posts. Have fun!