Pages

Powered by Blogger.
Showing posts with label Blogspot Tutorials. Show all posts

How to Add a Flickr Slideshow Gadget to Blogger

Tuesday, July 01, 2014

In today's Blogger tutorial I am going to show you how to add a Flickr Slideshow (Flickr Photostream) to a Blogger blog (Blogspot blog). This Blogger tutorial is suited to beginners and newbies to Blogger and contains step by step instructions to create your Flickr slideshow.

This Blogger slideshow tutorial covers the steps to insert a slideshow widget (slideshow gadget) in the sidebar or footer of Blogger and display a set of images uploaded to Flickr. Note the maximum number of images displayed in the slideshow is 20.

There are several different methods to add a Flickr slideshow to Blogger. Which method you use is largely dependent on your own individual requirements. I cover two different methods in the tutorial.

Method 1 - Add a Flickr Slideshow Gadget to Blogger - Photos in photostream are not organized into sets

Method 2 - Add a Flickr Slideshow Gadget to Blogger to display images that are organized in a set


Method 1 - Add a Flickr Photostream to Slideshow Gadget in Blogger

If you will only ever add one slideshow to Blogger from Flickr and don't want to bother with sets use this method to quickly and easily add your Flickr slideshow to Blogger:
  1. Go to Flickr and find your Photostream link. On your home page when logged into Flickr you will see Your Photostream at the top left under the Flickr salutation

  2. Click on the Your Photostream link and copy the photostream id from your browser address bar.
    http://www.flickr.com/photos/27647187@N07/
    It will look something like this. Copy the identifier eg 27647187@N07
  3. In Blogger go to Design > Page Elements
  4. Select Add Gadget from the sidebar or footer depending on where you want to place your Flickr slideshow
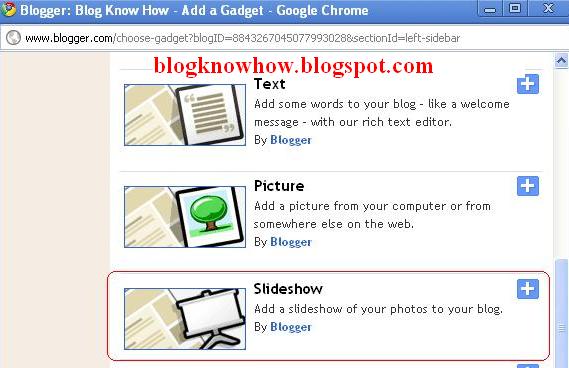
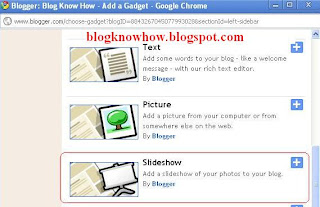
  5. Choose Slideshow from widgets in the Basics list
  6. Choose a title for your slideshow or leave blank
    How to Add a Slideshow to Blogger
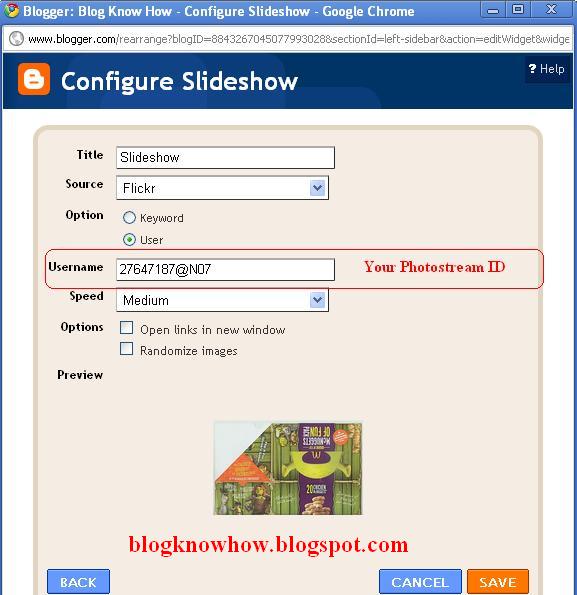
  7. Under Source use the drop down menu to select Flickr
  8. Under Option select User
  9. Under Username enter you Flickr Photostream id eg 27647187@N07.

    Note:If you have entered your Flickr Photostream id correctly you will be able to see a preview of your slideshow.
  10. Click on Save and then View Blog to see your new Flickr slideshow in action on your Blogger blog

    How to Add a Flickr Slideshow Gadget to Blogger


Method 2 - Add a Flickr Photostream Set to a Slideshow Gadget in Blogger

If you use sets in Flickr to organize your photos and images you will need to use a slightly different method to install a Flickr slideshow into Blogger.

  1. Log on to Flickr
  2. Upload your photos and create sets to organize your photos if desired
  3. Go to view your sets in Flickr and select the set you wish to use for your Blogger slideshow
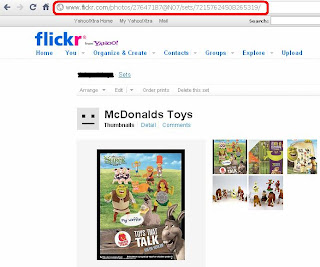
  4. In your browser window you will see a URL address similar to the following:
    http://www.flickr.com/photos/27647187@N07/sets/72157624508265319/

  5. There are two important parts to this address that you need to note because we will be using these to create our slideshow:
    • Your photostream - designated by something similar to 27647187@N07
    • The id of the set - designated by something similar to 72157624508265319

  6. In a different browser window log on to Blogger if not already logged in
  7. Go to Design > Page Elements
  8. Select Add Gadget from the sidebar or footer depending on where you want to place your Flickr slideshow
  9. Choose Slideshow from the list of Basics Widgets
  10. Click on the blue plus sign to the right of the Slideshow gadget to activate and configure your Blogger Flickr Slideshow
  11. Choose a title for your slideshow or leave blank
  12. Under Source use the drop down menu to select Other (Note do not select Flickr if you are using a set as this will not work - see Method 1)
  13. In the Feed URL section enter the following feed:
    http://api.flickr.com/services/feeds/photoset.gne?set=72157624508265319&nsid=27647187@N07&lang=en-us&format=rss_200

  14. Substitute your photostream id (this will unique to your Flickr account)
  15. Substitute the id of the set of images you wish to display

  16. Leave the speed of the slideshow at medium unless you specifically need it to be faster or slower
  17. Click on Save
  18. Click on the View Blog link to admire your new Flickr slideshow


In today's Blogger tutorial you have learned two different methods to add a Flickr slideshow to Blogger. Both methods use the Blogger Slideshow Gadget but the difference between them is that method 2 shows you how to use a selected part of your Flickr photostream to create a Blogger slideshow for your blog instead of your whole Flickr photostream. Hope you have lots of fun with this Blogger slideshow gadget. Enjoy!

How to Add Internal Links Within Blogger Posts

In the Blogger tutorial I discuss how to add internal links within your Blogger posts (Blogspot posts) to point to either another section within the same post or to another post.

There are lots of times when you may want to direct a reader to a different part of your Blogger post depending on what their needs and interests are. Or you might want to alert the visitor to something significant in a related post. In this article I will show how to make use of internal links both within posts and in Blogger generally.

Why bother with internal linking you may be wondering? Well the answer is to improve SEO. Blogs with a good internal linking structure will fare better than blogs that don't link posts. Plus you will be creating an aid to navigation for your reader. On longer posts jumps links to different sections within your post or to other posts mean readers can quickly find the information they are looking for.

How to Create Internal Links To Sections Within the Same Blogger Posts

How to Create Internal Links To Sections Within Different Blogger Posts

How to Create Internal Links To Sections Within the Same Blogger Post
Consider the above links. Click on them. Each jump the reader to a different part of this article. This type of internal linking is common practice in website building and can be equally applied to blogs to assist with navigation.

How did I create these links? The answer is that I used simple html that anyone can learn in a few minutes. Here are the steps I used to create these links.
  1. Log in to Blogger
  2. Go to Posting > New Post or Edit Post and either create a new article or edit an existing one.
  3. Within the article find a place where you want to add some jump links. This will be early on in the article as it will help the reader figure out what information is significant to them and how to get there quickly
  4. Switch to the Edit HTML mode rather than compose mode so you can see the code you are inserting into your post
  5. Create a couple of headings that will be your links to material further down in your Blogger article. Note you can also just jump to a word but for the purposes of this demonstration and clarity I am going to use headings. When creating this post I used the following headings:
    How to Create Internal Links To Sections Within the Same Blogger Post
    How to Create Internal Links To Sections Within Different Blogger Posts

  6. Add links to your headings like so:
    <a href="#withinposts">How to Create Internal Links To Sections Within the Same Blogger Post</a>

    <a href="#withinblogger">How to Create Internal Links To Sections Within Different Blogger Posts</a>

    • The href attribute and closing </a> element is the same structure you use for other links in your blog
    • Each identifier is preceded by a hash mark (#). The #tells the visitor's browser to look for a section within your post
    • Each link identifier needs its own unique identifier and needs to be enclosed in inverted commas. Use a name that reflects the link you are creating if possible as it will make it easier to identify on a page with a lot of internal jump links. 

  7. Now go to the first point in your post where you want to jump the reader to. This will be the start of some new idea, section or logical split in the information.
  8. At this point create your anchor text by first adding your heading and then enclosing your heading with this anchor structure.
    <a name="identifier">a heading</a>

    • Note the use of the name attribute at the beginning and the </a> element at the end
    • Each link identifier needs to be enclosed in inverted commas. Make sure to match up the correct identifier with the one created in step 6


    Using this anchoring structure our first anchor becomes:
    <a name="withinposts">How to Create Internal Links To Sections Within the Same Blogger Post</a>

    Substitute your own link identifier and headings
  9. Now move on to the next point you want to link to and create the second anchor. In this example we use the same structure but change the identifier
    <a name="withinblogger">How to Create Internal Links To Sections Within Different Blogger Posts</a>

    Again substitute your own link identifier and headings to suit your article
  10. Save and Publish as normal and you will see your links are live and will jump the reader to different parts of the post


How to Create Internal Links To Sections Within Different Blogger Posts
Now you know how to create links to sections within Blogger posts let's look at how to create internal links within different Blogger posts.

Most of you will be able to create a link to another post in Blogger using the posts editor. You just highlight the text you want and click on the figure eight icon and Blogger creates the link for you. Which is great most of the time. 

However what if we want to direct the visitor to a particular section of a different post? When you create an internal link it will take the viewer to the top of the page but what if you want them to see something near the end of the article? Well using an internal link similar to what we did to create internal links within the post we can.

Say I want to take my reader to a particular post in this case Blogger SEO Tips and Tricks. How would I go about it?

  1. I create the link as usual by copying the article URL address from the browser address bar and using the post editor to add the link. The Blogger post editor uses this structure:
    <a href="URLaddress">linkname</a>

    So the Blogger editor would create the following link:
    <a href="http://blogknowhow.blogspot.com/2009/05/blogger-blogspot-seo-tips-and-tricks.html">Blogger SEO Tips and Tricks</a>

    The link would appear like this in a browser:

    Blogger SEO Tips and Tricks
  2. Now I want to direct my visitors to the section about creating breadcrumb navigation so I add a section name using the following structure:
    <a href="URLaddress#identifier">linkname</a>

    Thus my link would look like this in the Edit HTML section of my post editor
    <a href="http://blogknowhow.blogspot.com/2009/05/blogger-blogspot-seo-tips-and-tricks.html#breadcrumb">Blogger SEO Tips and Tricks</a>

    Note the link seen in a browser remains the same
  3. If you want your link to open in a new browser window add the following to your link:
    <a href="http://blogknowhow.blogspot.com/2009/05/blogger-blogspot-seo-tips-and-tricks.html#breadcrumb"target="_blank">Blogger SEO Tips and Tricks</a>

  4. Now I need to go to the post I am linking to and add the anchor. So in the post SEO Tips and Tricks I would use the following structure to link to the section about how to add breadcrumbs:
    <a name="identifier">a heading</a>

    So the section about breadcrumbs in the Blogger SEO Tips and Tricks article is now enclosed by the following:
    <a name="breadcrumb">Add Breadcrumb Navigation to your Blogger Blog</a>


    If you now click on the link below you will see that your browser open a new window and take you directly to the section about adding a breadcrumb to your blog.

    Blogger SEO Tips and Tricks
  5. Save your changes and publish your article as normal


In this Blogger tutorial you have learned how to add internal links to a particular section of a post from both within the same Blogger post and within a different post. By adding internal links you will help your visitors to find their away your blog more easily and access information quickly. You will also be adding to your blog's SEO by linking related posts.

How to Highlight Author Comments in Blogger Posts

In this Blogger tutorial I will show you how to highlight the author comments section of your Blogger template (Blogspot template)using CSS styling.

Benefits of Adding CSS Styling to Author Comments
If you are using a default Blogger template chances are it is difficult to differentiate between comments made by visitors and comments made by you, the blog author. If you only have a few comments per post that may not be enough of an issue for you. If however, you have some posts with lots of comments you may need to make your remarks stand out from those of your visitors. We can do that by adding CSS styling to highlight your author comments.

What Will I Learn in This Tutorial?
In this Blogger tutorial you will learn how to easily add some highlighting to your comments so that they will never get lost in the crowd again. This requires a small amount of tweaking to your Blogger template which is not difficult to do if care is taken. The image below shows one example of what can be achieved using this Blogger hack and some CSS styling.


Will This Blogger Hack Work on My Template?
I have tested this Blogger hack on both the old generation of Blogger templates (Minima and Sand Dollar) and the latest generation of default Blogger templates eg Simple. It will also work on custom templates as the comments code is likely to be very similar.

If you are using a custom Blogger template and run into difficulty you can also try this alternative method to highlight author comments in Blogger posts

How to Add CSS Styling to Author Comments in a Blogger Post
The following instructions will highlight author comments in the comments section of a Blogger post. The code creates a shaded box around the comments made by the blog author. These changes will not affect the CSS the styling of any of the other comments made.

Instructions to Add CSS Highlighting to Author Comments in Blogger
  1. Login to Blogger
  2. From the Dashboard go to Design > Edit HTML
  3. Back up your template by downloading it to your computer
  4. Check the Expand Widget Templates checkbox on the top righthand side
  5. Use CTRL + F by entering the following into the search box
    <dd class='comment-body'>

  6. Immediately above this line paste the following code:
    <b:if cond='data:comment.author == data:post.author'>
    <dd class='comment-body-author'>
    <p><data:comment.body/></p>
    </dd>
    <b:else/>

  7. Now look for this code block
    <dd class='comment-body'>
    <b:if cond='data:comment.isDeleted'>
    <span class='deleted-comment'><data:comment.body/></span>
    <b:else/>
    <p><data:comment.body/></p>
    </b:if>
    </dd>

    and paste </b:if> immediately after it.
  8. Your code will now look like this:
    <div expr:id='data:widget.instanceId + &quot;_comments-block-wrapper&quot;'>
    <dl expr:class='data:post.avatarIndentClass' id='comments-block'>
    <b:loop values='data:post.comments' var='comment'>
    <dt expr:class='&quot;comment-author &quot; + data:comment.authorClass' expr:id='data:comment.anchorName'>
    <b:if cond='data:comment.favicon'>
    <img expr:src='data:comment.favicon' height='16px' style='margin-bottom:-2px;' width='16px'/>
    </b:if>
    <a expr:name='data:comment.anchorName'/>
    <b:if cond='data:blog.enabledCommentProfileImages'>
    <data:comment.authorAvatarImage/>
    </b:if>
    <b:if cond='data:comment.authorUrl'>
    <a expr:href='data:comment.authorUrl' rel='nofollow'><data:comment.author/></a>
    <b:else/>
    <data:comment.author/>
    </b:if>
    <data:commentPostedByMsg/>
    </dt>


    <b:if cond='data:comment.author == data:post.author'>
    <dd class='comment-body-author'>
    <p><data:comment.body/></p>
    </dd>
    <b:else/>


    <dd class='comment-body' expr:id='data:widget.instanceId + data:comment.cmtBodyIdPostfix'>
    <b:if cond='data:comment.isDeleted'>
    <span class='deleted-comment'><data:comment.body/></span>
    <b:else/>
    <p>
    <data:comment.body/>
    </p>
    </b:if>
    </dd>

    </b:if>

    </dd>
    <dd class='comment-footer'>
    <span class='comment-timestamp'>
    <a expr:href='data:comment.url' title='comment permalink'>
    <data:comment.timestamp/>
    </a>
    <b:include data='comment' name='commentDeleteIcon'/>
    </span>
    </dd>
    </b:loop>
    </dl>
    </div>

  9. Now using CTRL + F again find this line ]]></b:skin>
  10. Paste the following immediately before ]]></b:skin>
    .comment-body-author {
    background: #f5deb3;
    border: 2px solid #de7008;
    padding: 5px;
    }

  11. Save your template changes
  12. Click on View Blog and go to a post that you have commented on to see the CSS styling has highlighted your comments.


Alternative Method to Add Highlighting to Author Comments in Blogger
The following method will also add highlighting to author comments in Blogger and can be used if you have difficulty with the first method. It does however involve changing some code rather than just adding some so this is not as desirable in terms of future proofing your template for Blogger updates. 


  1. Login to Blogger
  2. From the Dashboard go to Design > Edit HTML
  3. Back up your template by downloading it to your computer
  4. Check the Expand Widget Templates checkbox on the top righthand side
  5. Find the following section of code by using CTRL + F and entering <data:comment.body/> into the search box
    <span class='deleted-comment'><data:comment.body/></span>
    <b:else/>
    <p><data:comment.body/></p>
    <b:include data='comment' name='commentDeleteIcon'/>
    </b:if>

  6. Replace with the following code after <span class='deleted-comment'> and before </b:if> as shown in red:
    <span class='deleted-comment'>
    <!--Highlight Author Comments Start-->
    <b:if cond='data:comment.author == data:post.author'>
    <p class='comment-body-author'><data:comment.body/></p>
    <b:else/>
    <p><data:comment.body/></p>
    </b:if>
    <!--Highlight Author Comments End-->

    </b:if>

  7. Use CTRL + F to find ]]></b:skin> that closes the CSS styling section
  8. Paste the following code immediately above ]]></b:skin>
    p.comment-body-author {
    background: #eeeecc;
    border: 2px solid #335577;
    padding: 5px;
    color:#558866;
    }

  9. Save your template
  10. Click on View Blog and navigate to a post that you have commented on to see the that your comments will now be highlighted


In this Blogger tutorial you have learned two different methods to add CSS styling to highlight the author comments in your Blogger posts. Obviously there is still some work to do on your part to adjust the colors in the CSS styling to match the color scheme of your blog. Good luck!

Remove Image Border in Default Blogger Templates Simple and Awesome Inc

In this Blogger tutorial I show you how to remove the border around images in Blogger posts (Blogspot posts) when using one of the latest default Blogger templates Simple or Awesome Inc.
If you are using an older generation Blogger template or a custom template the solutions contained in this article may work for you however it is more likely that you will need to follow the methods to remove image borders outlined in my previous Blogger tutorial Change or Remove Blogger Image Borders (Part 1)

Below I explore two methods of removing or deleting image borders in the Blogger template Simple. The first method shows you how to remove the image border using Template Designer and the second method outlined describes how to remove the image border manually by changing the code.


Method 1 - Use Template Designer to Remove Image Border in Blogger

  1. From the Blogger Dashboard go to Design > Template Designer
  2. Then select Advanced > Images
  3. Under Border Color use the drop down arrow to open the color palette
  4. Change the setting to transparent by checking the small box on the bottom right hand side marked "transparent"

    How to change the image border to transparent in Blogger
    Note: If you are using the black version of the Awesome Inc template you will need to change the Background Color to transparent too. Click on the down arrow of the color palette and select transparent.

    Remove border Awesome Inc Blogger template
  5. Click Apply to Blog to save your changes to the template
  6. Navigate to any post page to view images in posts without the border


Method 2 - Change Template Code to Manually Remove Image Border from the New Default Blogger Templates

  1. From the Blogger Dashboard go to Design > Edit HTML
  2. Back up your Blogger template
  3. Find this line amongst the declared variables at the top of your template
    <Variable name="image.border.color" description="Border Color" type="color" default="transparent" value="#cccccc"/>

  4. Change to the value of the border color to transparent like so
    <Variable name="image.border.color" description="Border Color" type="color" default="transparent" value="transparent"/>

  5. Save your changes to the template
  6. Navigate to any post page that has an image and see that the border around the image is no longer visible


In this Blogger tutorial (Blogspot tutorial) I have shown you how to remove or delete the border around images in Blogger posts for the newest generation of default Blogger templates Simple and Awesome Inc. I have discussed two different methods to remove the border around the images either by adjusting the settings in the Blogger Template Designer or by manually changing the code of the variable in the CSS styling section of the default Blogger template

How to Change Bullet Point Style in Blogger (Blogspot) Lists

In Part 1 of this three part series of Blogger tutorials I discuss how to change bullet point styles of lists you may want to include in Blogger posts. This first Blogger tutorial deals with unordered lists and how these can be styled using CSS in Blogger (Blogspot). The second part of these tutorials will deal with ordered lists while part 3 discusses bullet point changes you can make to your sidebar, footer and menus.

Today you will learn how to:
  • change the style of bullet points in unordered lists
  • add bullet points to unordered lists if they are absent
  • add an image instead of a bullet to lists in your Blogger posts

This tutorial is rated easy and is designed so that even Blogger newbies can make the changes they want to their Blogger template. Changing the bullet point style involves changing the CSS styling in your Blogger template (Blogspot template). Join me as I walk you through this step by step guide.

How to Add Bullet Points to a Blogger Post
If you are still using the old Blogger editor you will need to add bullet points manually to any unordered lists you create in Blogger posts. If you are using the new editor the work is done for you. Either way though this is the type of code that generates unordered lists:

<ul><li>Create your own list markers in Blogger</li>
<li>Create unordered lists in Blogger</li>
<li>Create bullet points in Blogger</li>
</ul>

Any text can be placed between the two <li></li> tags. Simply copy this list into a Blogger post and substitute your text for mine and you will have an unordered list.

Circular Bullet Points
Circular bullets (also known as markers or discs) are displayed in Blogger by default whenever unordered lists appear. This means that whenever the <ul></ul> tags are used in Blogger posts a leader dot or disc will appear before each line of text denoted by <li>. (Note I will discuss ordered lists <ol></ol> tags in part two of this tutorial).

An unordered list in a Blogger post using the <ul></ul> tags would appear like this:

  • Change Bullet Point Style in Blogger
  • Add Bullets to Blogger
  • Changing the look of unordered lists in Blogger


We can make lots of changes to the look of these filled discs or filled circles by changing the CSS styling in Blogger. For instance we can have squares, or we can choose to have no bullet point at all. Here's how.

To Add Square Bullet Points to Blogger (Blogspot)
The following code will replace the filled circle bullet points with squares instead:

  1. Login to Blogger if not already logged in
  2. From the Dashboard go to Design >Edit HTML
  3. Back up your template
  4. Find the posts section of your CSS stylesheet which will be before ]]></b:skin> tag
  5. For the following default Blogger templates eg "Simple" add the following CSS code to the post section like this
    .post ul li {
    list-style: square;
    }

  6. Save template and view blog post to see the circular bullet points have been replaced by square ones


To Add Circle Bullet Points to Blogger (Blogspot)
To add unfilled circle list markers or bullet points to Blogger posts do the following:

  1. Follow steps 1-4 as per square bullets
  2. Add the following code to the posts section of the CSS stylesheet of your Blogger template by entering the following code:
    .post ul li {
    list-style: circle;
    }

  3. Save the changes to your template and view a blog post to see the empty circle bullet points


How To Indent Bullet Points in Blogger
There are two ways to increase the indentation of list style markers or bullet points.

  1. Using the Inside or Outside Element
    The indentation of bullet points can be varied using the "inside" element. By default the list will be "outside" unless the "inside element" is used. The following code shifts the indentation of the list further to the right.
    .post ul li {
    list-style: circle inside;
    }


  2. Custom Indentation CSS Styling
    It is also possible to add custom indentation styling to lists. For instance here I have added a 2.5em indent using the following code to the circles example:
    .post ul li {
    list-style: circle;
    margin-left: 2.5em;
    }


How To Replace Bullet Points with an Image in Blogger (Blogspot) 
Sometimes you may prefer to have an image list marker or icon instead of a bullet point. You will need to host your image somewhere such as a free image hosting service eg Flickr or Photo Bucket. Follow the steps below to replace bullet points in your Blogger posts with an image

  1. Follow steps 1-4 as per square bullets
  2. In the CSS styling of the posts section of your Blogger template and before the </head> insert the following code:
    .post ul li {
    list-style: url("http://URLaddressofImage.gif");
    }

  3. Replace URLaddressofImage with the URL address of the image you have uploaded to an image hosting service. Note in most cases the file will have a .gif extension. If the extension is anything other than .gif you will need to change this too.

  4. Save the changes to your Blogger template and navigate to a post page to see your image list marker installed


How to Remove the Bullet Points from Blogger Posts
If you are going for a minimalist look you may prefer to have no bullet points in the lists in your Blogger posts. In this case:

  1. Follow steps 1-4 as per square bullets
  2. In the CSS styling of the posts section of your Blogger template and before the </head> insert the following code:
    .post ul li {
    list-style: none;
    }


Add a Comments Counter Button to Blogger Blogspot

In this Blogger tutorial (Blogspot tutorial) you will learn how to add a comments counter button to Blogger (Blogspot) to show off the number of comments each of your posts has received.

A comment counter button (bubble) will have the effect of encouraging visitors to comment on your Blogger blog and also help to highlight the credibility of your articles.


Installing this Blogger hack to add a comment counter button only takes a few minutes. The changes needed to add the comment bubble to Blogger while not difficult do involve adding a small snippet of code to your Blogger template in two places. For this reason I strongly urge you to back up your Blogger template before attempting this blogger hack.
Blogger Tutorial Difficulty - easy to medium


How to Add a Comments Counter Bubble to Blogger
A Step-by-Step Walkthrough
The following steps will insert a fully clickable comments counter button on the same line as the post title in Blogger. The comments counter is right aligned by default.

  1. Log in to Blogger and the blog you wish to apply these changes to
  2. Select Design > Edit HTML
  3. Click on Download Full Template to back up your template before you make any changes
  4. Check the Expand Widget Templates box
  5. In the CSS Styling section of your Blogger template and just before the ]]></b:skin>
    .comments-button {
    width : 48px;
    height : 48px;
    background : url(https://blogger.googleusercontent.com/img/b/R29vZ2xl/AVvXsEi8bU7uHm6pfuCr6DpmLLvEOVkiU2CkQfmhjsYX0hwZFcAYWV5DLEjur_PlSxAu8RvlxsMp7K3_zqdhpT3c-a-aF-4isH_zMrKzfIZ9fQ-b-krT1j-PRAuaqnzh8kTfRg_AYpzMTrogNp1C/s200/comment-counter-bubble.png) no-repeat;
    float : right;
    font-size : 18px;
    margin-top : -15px;
    margin-right : 2px;
    text-align : center;
    padding-top:10px;
    }

  6. Now find the following block of code using CTRL key + F
    <b:includable id='post' var='post'>
    <div class='post hentry uncustomized-post-template'>
    <a expr:name='data:post.id'/>
    <b:if cond='data:post.title'>
    <h3 class='post-title entry-title'>
    <b:if cond='data:post.link'>
    <a expr:href='data:post.link'><data:post.title/></a>

  7. Copy this code block:
    <b:if cond='data:post.allowComments'>
    <a class='comments-button' expr:href='data:post.addCommentUrl' expr:onclick='data:post.addCommentOnclick'><data:post.numComments/></a>
    </b:if>

  8. Insert as follows:
    <b:includable id='post' var='post'>
    <div class='post hentry uncustomized-post-template'>
    <a expr:name='data:post.id'/>
    <b:if cond='data:post.title'>
    <h3 class='post-title entry-title'>
    <b:if cond='data:post.allowComments'>
    <a class='comments-button' expr:href='data:post.addCommentUrl' expr:onclick='data:post.addCommentOnclick'><data:post.numComments/></a>
    </b:if>

    <b:if cond='data:post.link'>
    <a expr:href='data:post.link'><data:post.title/></a>

  9. Save template and then view blog to admire your new comment counter badge.


Tips and Troubleshooting

  1. If you prefer you can replace the button image I have provided with your own image. You can find other buttons easily enough by doing a Google search with a term like "speech button icons".
    Upload your button to a hosting service such as Photobucket and change the URL address of the image in the CSS styling section. The following example will render a smaller blue button. Note I have reduced the font size to accommodate the change. You may need to play around with the settings to get the font sizing right for your image.
    .comments-button {
    width : 48px;
    height : 48px;
    background : url(https://blogger.googleusercontent.com/img/b/R29vZ2xl/AVvXsEisT_Aqgowe8DJ8JbAk4Ps56Xg4V3L4uxsOZnGesEf0ufYmxkLZc5nNK2CQhltgfCrI66zRZBks_aC2lf-QK1cr94r7vIW8KmPddBcFQ1EcfT4bkxAzWR_3nUT89pCj3CSlJaZ8pblBpPep/s200/comment-counter-bubble-2.png) no-repeat;
    float : right;
    font-size : 14px;
    margin-top : -15px;
    margin-right : 2px;
    text-align : center;
    padding-top:10px;
    }

  2. If you want your comment counter to be left aligned instead of right you will need to change the CSS styling from float:right; tofloat:left;

In today's Blogger tutorial I have covered how to add a comments counter to a Blogger blog (blogspot blog) that will appear to the right of your blog post title. A comments counter is a way to encourage visitors to comment and is a way of showing off the credibility of your blog posts. Good luck! Any comments about installing this blogger hack are most welcome.

How to Add a Table to Blogger Blogspot Post

This Blogger tutorial (Blogspot tutorial) explains how to put a table into a Blogger post. You will learn how to create tables in Blogger ranging from a simple table to a more complex table with alternating colors.

We will start with a basic table and gradually add CSS styling to the table to improve the look and functionality until we have built the table pictured directly below. No knowledge of CSS and HTML is assumed so this Blogger tutorial is suitable for absolute bloggingbeginners.

A Blogger Table Caption
Table HeaderTable HeaderTable Header
Table CellTable CellTable Cell

Tables are a useful way to display information particularly tabulated information. Tables are good whenever you want to align information so that it is easy to read and understand. You can add text, hyperlinks and even images to a table which makes them very useful for presenting information.

There is no easy way to add tables in Blogger yet. Even if you are using the new editor you will note that no table button is provided. Fortunately it is easy enough to use a bit of CSS styling to spruce up a table and enter this manually into a Blogger post.

How to Add a Table to Blogger Posts
First you will learn how to add a simple table to Blogger. We are going to start with a table with 3 columns and 4 rows including a header row. Then I will show you step by step how to add different features to the table including how to add extra rows, a background color to the header, a border, a caption, change the size of the table, center align the table and more.


Table HeaderTable HeaderTable Header
Table CellTable CellTable Cell


  1. In Blogger open either a new post or an existing post that you wish to add a table to
  2. Click on the Edit HTML tab on your Blogger editor
  3. Copy the following code into your Blogger post which will produce the basic table as shown above:
    <table border="2" bordercolor="#0033FF" style="background-color:#99FFFF" width="100%" cellpadding="3" cellspacing="3">
    <tr>
    <th>Table Header</th>
    <th>Table Header</th>
    <th>Table Header</th>
    </tr>
    <tr>
    <td>Table Cell</td>
    <td>Table Cell</td>
    <td>Table Cell</td>
    </tr>
    <tr>
    <td>Table Cell</td>
    <td>Table Cell</td>
    <td>Table Cell</td>
    </tr>
    <tr">
    <td>Table Cell</td>
    <td>Table Cell</td>
    <td>Table Cell</td>
    </tr>
    </table>

  4. Make changes to the table to suit your own Blogger template if necessary by changing the following:
    <table border="2" bordercolor="#0033FF" style="background-color:#99FFFF" width="100%" cellpadding="3" cellspacing="3">

    • Border width (blue)
    • Border color (black)
    • Background color (red)
    • Table width (orange) Can be a percentage or actual width eg 500px

  5. Now we are going to fix an annoying problem in Blogger which renders too much white space above the table. We do this by adding the following styling denoted in red directly above the table tag and adding a closing </div> at the end of the table code
    <style type="text/css">.nobrtable br { display: none }</style>
    <div class="nobrtable">

    <table border="2" bordercolor="#0033FF" style="background-color:#99FFFF" width="100%" cellpadding="3" cellspacing="3">
    <tr>
    <th>Table Header</th>
    <th>Table Header</th>
    <th>Table Header</th>
    </tr>
    <tr>
    <td>Table Cell</td>
    <td>Table Cell</td>
    <td>Table Cell</td>
    </tr>
    <tr>
    <td>Table Cell</td>
    <td>Table Cell</td>
    <td>Table Cell</td>
    </tr>
    <tr">
    <td>Table Cell</td>
    <td>Table Cell</td>
    <td>Table Cell</td>
    </tr>
    </table></div>

  6. Let's add some further styling to our table header to improve the look of our table as denoted in red. Change the background color and color attributes to suit your own color scheme if you wish

    Table HeaderTable HeaderTable Header
    Table CellTable CellTable Cell
    Table CellTable CellTable Cell
    Table CellTable CellTable Cell

    <style type="text/css">.nobrtable br { display: none }</style>
    <div class="nobrtable">
    <table border="2" bordercolor="#0033FF" style="background-color:#99FFFF" width="100%" cellpadding="3" cellspacing="3">
    <tr style="background-color:#0033FF; color:#ffffff; padding-top:5px; padding-bottom:4px;">
    <th>Table Header</th>
    <th>Table Header</th>
    <th>Table Header</th>
    </tr>
    <tr>
    <td>Table Cell</td>
    <td>Table Cell</td>
    <td>Table Cell</td>
    </tr>
    <tr>
    <td>Table Cell</td>
    <td>Table Cell</td>
    <td>Table Cell</td>
    </tr>
    <tr>
    <td>Table Cell</td>
    <td>Table Cell</td>
    <td>Table Cell</td>
    </tr>
    </table>

  7. Now let's add another row to our table for Blogger so you can see how this is done

    Table HeaderTable HeaderTable Header
    Table CellTable CellTable Cell
    Table CellTable CellTable Cell
    Table CellTable CellTable Cell
    Table CellTable CellTable Cell

    <style type="text/css">.nobrtable br { display: none }</style>
    <div class="nobrtable">
    <table border="2" bordercolor="#0033FF" style="background-color:#99FFFF" width="100%" cellpadding="3" cellspacing="3">
    <tr style="background-color:#0033FF; color:#ffffff; padding-top:5px; padding-bottom:4px;">
    <th>Table Header</th>
    <th>Table Header</th>
    <th>Table Header</th>
    </tr>
    <tr>
    <td>Table Cell</td>
    <td>Table Cell</td>
    <td>Table Cell</td>
    </tr>
    <tr>
    <td>Table Cell</td>
    <td>Table Cell</td>
    <td>Table Cell</td>
    </tr>
    <tr>
    <td>Table Cell</td>
    <td>Table Cell</td>
    <td>Table Cell</td>
    </tr>

    </table>

  8. In this step we are going to center the contents of our Blogger table. This can be done in several ways but we are going to take a short cut here by assigning a style to every table row

    Table HeaderTable HeaderTable Header
    Table CellTable CellTable Cell
    Table CellTable CellTable Cell
    Table CellTable CellTable Cell
    Table CellTable CellTable Cell

    <style type="text/css">.nobrtable br { display: none } tr {text-align: center;} </style>
    <div class="nobrtable">
    <table border="2" bordercolor="#0033FF" style="background-color:#99FFFF" width="100%" cellpadding="3" cellspacing="3">
    <tr style="background-color:#0033FF; color:#ffffff; padding-top:5px; padding-bottom:4px;">

  9. Now we are going to jazz up our Blogger table by adding alternating colored rows to improve readibility and appearance. By far the easiest way to do this is to assign a class.

    Table HeaderTable HeaderTable Header
    Table CellTable CellTable Cell
    Table CellTable CellTable Cell
    Table CellTable CellTable Cell
    Table CellTable CellTable Cell

    <style type="text/css">.nobrtable br { display: none } tr {text-align: center;} tr.alt td {background-color: #eeeecc; color: black;}</style>
    <div class="nobrtable">
    <table border="2" bordercolor="#0033FF" style="background-color:#99FFFF" width="100%" cellpadding="3" cellspacing="3">
    <tr style="background-color:#0033FF; color:#ffffff; padding-top:5px; padding-bottom:4px;">
    <th>Table Header</th>
    <th>Table Header</th>
    <th>Table Header</th>
    </tr>
    <tr class="alt">
    <td>Table Cell</td>
    <td>Table Cell</td>
    <td>Table Cell</td>
    </tr>
    <tr>
    <td>Table Cell</td>
    <td>Table Cell</td>
    <td>Table Cell</td>
    </tr>
    <tr class="alt">
    <td>Table Cell</td>
    <td>Table Cell</td>
    <td>Table Cell</td>
    </tr>
    </table>

  10. It is also easy to add a caption to your Blogger table. For a caption above the table simply add the caption line as shown in red. For a caption below the table add the caption line in red and a style as shown in blue

    A Blogger Table Caption
    Table HeaderTable HeaderTable Header
    Table CellTable CellTable Cell
    Table CellTable CellTable Cell
    Table CellTable CellTable Cell
    Table CellTable CellTable Cell

    <style type="text/css">.nobrtable br { display: none } tr {text-align: center;} tr.alt td {background-color: #eeeecc; color: black;} tr {text-align: center;} caption {caption-side:bottom;} </style>
    <div class="nobrtable">
    <table border="2" bordercolor="#0033FF" style="background-color:#99FFFF" width="100%" cellpadding="3" cellspacing="3">
    <caption>A Blogger Table Caption</caption>
    <tr style="background-color:#0033FF; color:#ffffff; padding-top:5px; padding-bottom:4px;">
    <th>Table Header</th>
    <th>Table Header</th>
    <th>Table Header</th>
    </tr>
    <tr class="alt">
    <td>Table Cell</td>
    <td>Table Cell</td>
    <td>Table Cell</td>
    </tr>
    <tr>
    <td>Table Cell</td>
    <td>Table Cell</td>
    <td>Table Cell</td>
    </tr>
    <tr class="alt">
    <td>Table Cell</td>
    <td>Table Cell</td>
    <td>Table Cell</td>
    </tr>
    </table>

  11. One more important property needs to be addressed in our new Blogger table to improve the look. We can reduce the double border into a single one. The easiest way to do this is to change the cellspacing to zero as denoted in red. Or, alternatively we can apply the border collapse property to our table as shown in blue. Note: Border collapse may not be supported by all browsers particularly if the cellspacing attribute is defined also)

    A Blogger Table Caption
    Table HeaderTable HeaderTable Header
    Table CellTable CellTable Cell
    Table CellTable CellTable Cell
    Table CellTable CellTable Cell
    Table CellTable CellTable Cell

    <style type="text/css">.nobrtable br { display: none } tr {text-align: center;} tr.alt td {background-color: #eeeecc; color: black;} tr {text-align: center;} caption {caption-side:bottom;}</style>
    <div class="nobrtable">
    <table border="2" bordercolor="#0033FF" style="background-color:#99FFFF; border-collapse:collapse;" width="100%" cellpadding="10" cellspacing="0">
    <caption>A Blogger Table Caption</caption>
    <tr style="background-color:#0033FF; color:#ffffff; padding-top:5px; padding-bottom:4px;">
    <th>Table Header</th>
    <th>Table Header</th>
    <th>Table Header</th>
    </tr>
    <tr class="alt">
    <td>Table Cell</td>
    <td>Table Cell</td>
    <td>Table Cell</td>
    </tr>
    <tr>
    <td>Table Cell</td>
    <td>Table Cell</td>
    <td>Table Cell</td>
    </tr>
    <tr class="alt">
    <td>Table Cell</td>
    <td>Table Cell</td>
    <td>Table Cell</td>
    </tr>
    </table>

  12. Now go ahead and add your data to your new Blogger table. Filling in each instance of "Table Header" and "Table Cell" with your own data. The information you add to the Blogger table can be text, hyperlinks or even an image
  13. Save your changes to the Blogger table by saving and publishing your post

Please feel free to use this Blogger table as a template whenever you need to add a table to your Blogspot post. If you want to regularly add a table to your Blogger posts that consistently looks the same you could consider adding the table CSS styling to your Blogger template. 

In this Blogger tutorial (Blogspot tutorial) I have demonstrated how to build a complex table in HTML and CSS to insert into a Blogger post. You have learned how to manipulate a variety of table properties and attributes to create a table for Blogger that matches the color scheme of your blog and is functional and appealing.