Pages

Powered by Blogger.

Add Google Analytics to a Blogger Blog

Monday, July 21, 2014

If you are new to blogging at Blogger.com you might not be aware that tracking and statistics software can be linked to your site to give you details about your visitors. The process of adding a free tracking program such as Google Analytics is relatively straightforward. By following the simple steps below you will gain access to very useful data about the kind of traffic accessing your site. This will help you grow your site and target your content to meet the needs of your visitors.

Steps to Add Google Analytics to Your Blogger Blog

1. Login to Google Analytics
Login to Google Analytics at http://google.com/analytics with your Blogger.com login. If for some reason you wish to create a new account you can do so but be aware that you will lose the advantages of accessing other Google services such as Google Webmaster Tools and Google Adsense without having to log out.

2. Sign Up to Google Analytics
Click on the Sign Up button and you will be taken to the Analytics - New Account Signup page. Enter your blog URL, account name, country, and time zone on this page.

URL
The URL of this blog is blogknowhow.blogspot.com

You would enter nameofyourblog.blogspot.com

Account Name
It is a good idea to choose a general name such as Mike's Account because this will be the account name for anything from 1 to 100 websites.

Click on Continue.

In the next screen you will be prompted to enter your personal details: your name, phone number and country. Complete these and click on Continue.

The final sign up page is the Terms of Agreement screen. Once you agree to these your sign up is complete.

3. Copy the Code Block
After completing the signup process Google Analytics provides you with a code block of javascript to be added to your site.

To copy the code highlight the code block and use the command Ctrl + C to quickly copy the code to the clipboard of your computer. Leave the window open as you are going to return there.

4. Login to Blogger.com at http://www.blogger.com/
In a new window login to your site at Blogger.com and navigate from the Dashboard to the Layout tab.

5. Navigate to Edit HTML in the Layout Menu
From the Layout menu select the Edit HTML link (third from the left after Page Elements and Font and Colors). You are going to be adding a little bit of code to your template so care needs to be taken here not to overwrite any existing code. As a precaution it is advisable to backup your template at this point. You will see the option to do so.

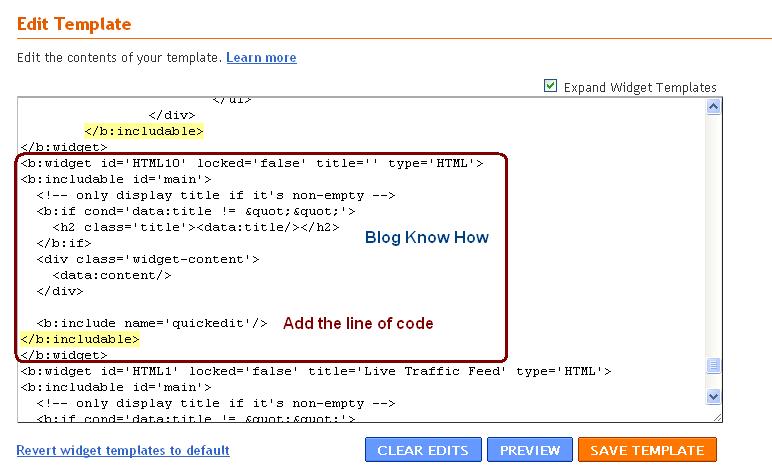
6. Add Code Block to Your Blogger Template
To add the code block to your template you will need to locate the code that closes the body tag. This will be very near the bottom of the template. You will need to paste the code block immediately before the tag.

Add Google Analytics Code to Your Blogger Template
To paste the code block position the cursor in front of the tag and use the command Ctrl + V. Once the code is placed in your template and you are sure it is positioned correctly click on Save Template. All going well you have now successfully added Google Analytics to your Blogger blog.

7. Return to Google Analytics
Go back to the Google Analytics window. On the Overview page you will see details about your blog such as Reports, Status, Visits etc. If there is a tick in the status column your Analytics code is working correctly. The screen should look something like the one pictured below.


Google Analytics Overview Page
If the Status contains a yellow triangle symbol with an exclamation mark inside don't despair it just means that Google has not yet updated details of your site. Check back in 24 hours as it can take Google sometime from installing the code to actually providing reports.

Once Google Analytics is successfully receiving data about your site you can begin to make use of the wealth of information at your fingertips.

8. Troubleshooting
If after a day the status still displays a yellow triangle you may need to troubleshoot. A yellow triangle is displayed when the code is not detected or not verified.

Check your Blogger template to ensure the code block is pasted in the correct position.

Further help:
You will find excellent help from Google Analytics at http://www.google.com/support/analytics/.

For details about why Google Analytics is not able to track your site check out
http://www.google.com/support/analytics/bin/answer.py?hl=en_US&answer=57053&utm_id=ad

Track Visitors to Your Blogger Blog

A tracking and statistics program is a necessary tool for anyone wishing to build a profitable blog. It will show you useful information about how people found your blog, keywords they used to find it and how long they stayed.

There are a number of analytics programs that are available for use with your Blogger (Blogspot) blog. Three popular free options are:

Google Analytics (up to five million page views per month)
Site Meter (starting at 25K pageviews)
Stat Counter (up to 500 pageview log/250K pageviews/monthly)

While each of these have certain limitations any of these will give you access to invaluable data about traffic to your Blogger blog.

Advantages of Tracking Visitors to Your Site
There are a number of advantages of tracking visitors to your site.

Firstly you will get a clear understanding of the demographics of your site traffic including information like geographical location and length of visits. This kind of information is useful for targeting content to meet the specific needs of your visitors age groups, lifestyles etc. It will enable you to extend your reach and tap into a larger target audience.

Another advantage is that as your site grows you will have the ability to identify trends. An analytics program will provide a snapshot view of the results of different strategies you might employ, the success of posts and of additions like social bookmarking and networking, stumbles and diggs. You will be able to determine the rate of increase in traffic and identify areas where you could improve for instance by targeting specific keywords.

Without this kind of information it is difficult to gauge the performance of your site. If you are interested in growing your site and I am sure you are then you will find access to analytics invaluable in determining where to put your energies. If you decide to sell your site further down the track you will need hard evidence about the level of traffic your site receives.

How to Add Analytics to Your Blogger Blog?
To add a tracking and statistics to your Blogger blog you will need to place a code block in your template. This is a relatively straightforward process. For a step by step tutorial of how to add Google Analytics to Your Blogger blog see my previous article Add Google Analytics to Your Blogger Blog.

This article has covered the advantages and benefits of adding a statistics and tracking program to your Blogger blog. An analytics program will help you track visitors to your blog and understand traffic trends. Grow your Blogger (Blogspot)site today by adding a free tracking and statistics program such as Google Analytics, Site Meter or Stat Counter.

Add Feedjit Live Traffic Feed to Blogger

Would you like to know more about the traffic visiting your Blogger blog (Blogspot Blog)? Feedjit is a free tracking tool that tracks visitors to a blog in real time and identifies what pages are visited. In this Blogger tutorial you will learn how to add a Feedjit widget to your blog which will track where visitors originate from and what pages they viewed. Adding a Feedjit widget to your Blogger blog is easy and takes less than 5 minutes. This tutorial is suitable for all Blogger bloggers (Blogspot beginners). Updated 10 October 2009.

Feedjit monitors traffic to your site and ranks it based on popularity and relevance against the traffic received by other Feedjit users in your local area. There is a choice of 4 different widgets: Live Traffic Feed, Live Traffic Map, Recommended Reading, and Page Popularity. Each of these widgets has different functions.

Feedjit Live Traffic Feed Widget for Blogger
Places a widget on your Blogger blog of the last 10 visitors. By clicking on the real time link you can actually view the last 50 or so visitors along with the keyword search phrase used to find your site. The Feedjit's Live Traffic Feed shows statistics in real-time about:

The city and country your visitors are in

The website they arrived from, if any

The page they visited on your website

Which external link they clicked to leave your site, if any

Feedjit Traffic Map
The Traffic Map widget places visitors to your site on a world map according to their physical location

Feedjit Recommended Reading
The Recommended Reading widget makes suggestions to visitors about what other blog posts they might be interested in based on general page popularity

Feedjit Page Popularity
The Page Popularity widget lists the 10 most popular pages that have been accessed by visitors on that day.


How to Add a Feedjit Live Traffic Feed Widget (Gadget) to Blogger
  1. Visit Feedjit
  2. Select Live Traffic Feed.
  3. Click on the Customize It link under Live Traffic Feed. This will allow you to enter colors to match the theme of your blog. If you are in doubt I have found that the easiest method to get the custom colors of a site is to go to the Layout > Page Elements screen in Blogger and click on Add a Gadget and then Adsense. From the configuration screen that pops up you can get the colors of the background, border, title (heading in Feedjit), URL, text. If you use these same colors in your Feedjit widget it will blend in with the rest of your site. You can preview your widget to make sure it looks as you would like it before adding it to your blog.
  4. To automatically add the widget to Blogger select the Click to Add to Blogger Link and follow the instructions. Or to manually add it which I myself prefer right click the code in the box under the heading Live Traffic Feed and select copy.
  5. Navigate to Layout > Page Elements in your blog if that page is not already open
  6. Select Add a Gadget in the Sidebar and then HTML/Javascript
  7. Paste the code by placing the mouse in the box and right clicking and selecting paste
  8. Save the widget and then using the drag and drop feature of Blogger move it to your desired location. Note HTML/Javascript widgets are best placed after your other widgets for faster loading.
  9. Save Template
  10. Click on View Blog to view your newly created Feedjit widget
  11. Click on Options in the Feedjit widget and then Ignore My Browser otherwise the widget will record your visit each time you view your blog. The option on the widget will now change to Stop Ignoring Me which you can reverse by clicking on the link again.If you use more than one browser you will need to tell Feedjit to ignore you for each browser.

This Blogger tutorial has discussed how to add a Feedjit Live Traffic Feed widget, gadget or button to Blogger to track where visitors are being directed from and what posts they are most interested in. A Feedjit Live Traffic Feed will help you learn about the visitors to your blog and what search phrase they used to arrive. To add a Feedjit Live Traffic Feed widget to Blogger is simple and takes less than 5 minutes to install.

Submit Blogger Blog to Blog Directories

This article discusses the benefits of submitting your Blogger Blogspot blog to blog directories and provides a comprehensive list of some of the best blog directories on the internet. This is an introductory article aimed at the new Blogspot blogger but is suitable for any blogger who wishes to build site traffic quickly.

Benefits of Submitting to Blog Directories
By adding your Blogger Blogspot blog to blog directories you are likely to increase your site traffic expotentially. If your site has been languishing in the doldrums and not getting the kind of traffic you were expecting it could be that you haven't generated enough inbound links to your site. Signing up to some top performing blog directories will create quality backlinks and expose your site to many potential visitors.

I have signed up for each blog directory in the recommended list below and in all cases have found that they have generated at least some site traffic. A few have boosted traffic considerably and have helped me establish new blogs quickly by generating an audience. One or two blog directories have more than exceeded my expectations. TopBlogList and Blog Catalog fall into this category attracting 10 or so unique visitors within a day of sign up.

How do Blog Directories Work?
Most blog directories require that you place their button somewhere on your blog. In some cases the button's function is to track visitors from your site to the directory. Some buttons may reflect the ranking of your blog in relationship to other blogs in your chosen category within the directory. If you see a number appear on the button it denotes your blog's position.

Get Organized Before You Begin Submitting to Blog Directories
To add your blog to a blog directory you first need to register. The sign up process will run more smoothly if you get a little organized before you begin. I suggest that you take the following steps first:

Craft a description for your blog of around 400 words

Check your feed details as you may be asked to provide the URL of your feed. This is especially important if you have burned your feed at a feedburning service like Feedburner

Make sure you know the exact URL address of your site. If in doubt navigate to your home page and check the the URL in the address bar

Decide which email address to use. Blog directories tend to create a lot of mail so unless you want to have your mailbox clogged up consider carefully which email address would be best. You may decide to start a new email address specifically to handle this kind of mail.

Decide on a username and password and stick to it throughout as it will make life a lot easier than trying to remember twenty different usernames and passwords

Determine your top six keywords and keyword phrases as most blog directories ask you to provide these tags

With such a big choice of blog directories to submit to I have found it pays to be systematic. Keeping a list of where you've signed up in Notepad or similar will help guard against double ups.

How to Add a Blog Directory Button to Your Blogger Blog
Most blog directories send out an email on sign up. Once you click on the link you membership will be confirmed. In most cases you will then be directed to a menu where you can begin adding your blog or blogs to the directory. Once you have entered the details of your blog the directory will generate the button code which can be copied and pasted into a HTML/Javascript widget. It is a good idea to place all buttons together in one widget for convenience and to reduce loading time. If you are uncertain how to add this widget to your Blogger blog please refer to my earlier post about Adding third party HTML/Javascript code to a sidebar widget.


List of Recommended Blog Directories to Get Started
All of the blog directories listed below I have personally signed up for as mentioned above. The blog directories are in no particular order except that I have put Blog Catalog and Top Blog List first because I have found them good.


Blog CatalogMy BlogCatalog BlogRank
Blog Catalog ReadersBlogCatalog is a social community for bloggers and one of the largest blog directories on the internet. It is a good option to begin promoting your own blog and to connect with other bloggers. BlogCatalog offers lots of linking options. You can add a button, a link to your blogroll or verify your site using a meta tag and dispense with a visible site link altogether. In addition you can add a Blog Catalog Readers widget to your blog like the one you see here.

Top Blogging Bloggers Guide to Customising Blogspot Blog
Easy sign up. Only one keyword phrase permitted so make it a goodie. Ranking is based on unique visitors

TopBlogArea Top Blog Area
This blog directory tracks unique visitors. No option for visitors to vote. Every month statistics are reset to zero to give everyone a chance of being highly rated

TopBlogLists
Ranking of pages is done according to the number of unique visits each blog brings in to Top Blog Lists

Blog Top Sites
A nice control panel for site management. Ranking of pages is done according to the number of unique visits each blog receives in a month.

Top of Blogs Top of Blogs
Ranks blogs according to the number of visits a blog receives in a certain amount of time (daily, weekly, monthly, etc.).

BlogTopList Blog Top List
Requires two buttons to be placed on your blog. One is the tracking button which tracks number of visitors and displays the rank of your site. The other button is the voting button. If a visitor votes for you it is equal to 100 unique visits .

BlogPulse
Tracks thousands of blogs. Submit yours. Try doing a check first though as you may be surprised to find your blog has already been located automatically.

BlogFlux
Over 140,000 blogs in the Blog Flux directory. Nice Control Panel interface.
Sign up is immediate although all blogs added are manually checked so there is a time delay before your blog will be included.

Blogorama
Top 100 most popular section. Score increases depending on variables like users ratings, incoming traffic and outgoing traffic.

My Blog Directory My Blog Directory
Blog of the day feature chosen on the basis of the number of unique visitors directed by the blog to the directory per day. The blog of the day gets the whole of the site traffic fof that day. Blogs are listed randomly so that every blog gets equal exposure.


Other Blog Directories You May Be Interested In
I have not necessarily submitted a blog to these blog directories but I am providing a link if you want to follow it up. Not sure about overall chances of an increase in traffic with these ones though.

Bloggernity
Free Blog Directory
Blog Rankings


Lists of Blog Directories
For a longer list of blog directories try:
Great Blog Directories for a list of free directories

In this article I have discussed some benefits of submitting your Blogger Blogspot blog to blog directories. I have suggested ways to get organized to make the process less daunting and I have recommended some blog directories which I have personally signed up for to get you started. Adding your Blogger blog to these blog directories should result in an increase in site traffic. Good luck!

Add Outbrain Ratings Widget to Blogger

Outbrain provides a free and very stylish content recommendations and ratings widget which can be easily added to your Blogger Blogspot blog. In this tutorial I will discuss the benefits of Outbrain and also provide a step by step walkthrough of the process of adding an Outbrain widget to your Blogger blog and your Feedburner FeedFlare if you have burned your blog feed at Feedburner.

Outbrain Home Page
Benefits of Adding Outbrain to Your Blogger Blog
By adding an Outbrain content and ratings widget to your Blogger blog you will encourage visitors to record their reactions to a post they have just read. Along with features likes polls this is another good method of encouraging visitors to interact with your blog. Outbrain also makes it possible to display your most popular posts within the widget. In addition the Outbrain ratings widget may help drive more traffic to your blog when your visitors use the Recommended Posts feature which is embedded in the widget. By the same token it may also mean that the traffic doesn't stay long as visitors will be wooed away by recommended links so you will have to weigh up the benefits versus the costs for yourself. Outbrain also provides reports on widget activity

How to Add an Outbrain Ratings Widget to Blogger
1. Register at Outbrain. This is a simple sign up process that requires you to click on a confirmation email once you have requested sign up and filled out a simple form.

2. Once registered click on Get the Widget from the footer menu

3. Choose Blogger as your Blogging platform

4. Select the language of your widget if other than English which is the default

5. Click on Get the Widget button and Outbrain will automatically refer you to Blogger in a new window. Sign in to Blogger in the new browser window. Don't close the Outbrain window as we will be returning here.

Outbrain Get Widget page
6. Choose your blog from the drop down menu and click on the Add Widget button.

Add Outbrain Widget to Blogger
7. Navigate to Layout > Page Elements and reposition if necessary your new widget which will now be appearing in the sidebar of your blog. Save any changes you make.

8. Return to Outbrain in your open browser window and click on the click here link to verify your blog. You will receive a message verifying that you have claimed your blog

9. Click on the View Blog link in the menu tab section and view your new Outbrain widget in action.

Outbrain Ratings Widget as it appears at the bottom of a Blogger post
Note that once your readers start to rate your posts by clicking on them the stars will become yellow. 5 yellow stars is an excellent rating


Customizing Your Outbrain Ratings Widget
1. Return to the Outbrain window in your browser

2. Navigate to Manage Posts using the Sidebar Menu on the lefthand side

3. In the list of blogs you will see your blog listed. Click on the settings link

Outbrain Manage Blogs Screen
4. If you leave the default setting you will see recommended links appearing as pictured above in #9. If you don't want any recommendations you can set this to no.

5. If you have set up your blog with the idea of earning a little extra money you may choose to turn off sponsored recommendations. If you leave the radio button set to yes any proceeds from the sponsored links clicked on will go to charity. The charity sponsored can be selected via the drop down menu

6. Outbrain will show the most popular posts in the sidebar of your blog if this feature is enabled. To enable popular posts select the enable radio button.

7. Click on the Submit button


Adding Outbrain to Your Feedburner FeedFlare
If you already have a FeedFlare appearing at the footer of your burned Feedburner feed of your blog you can easily add Outbrain too. Check out my article on adding a Feedburner FeedFlare to Blogger if you are not sure what a FeedFlare is or how to add one to Blogger.

Go to Feedburner and choose your blog from the list of My Feeds. Select the Optimize tab and then FeedFlare from the lefthand sidebar menu. In the Personal FeedFlare section paste the following code (URL) into the text box:
http://widgets.outbrain.com/FeedFlareUnit.xml

and click on the Add New Flare button. Click on Save. Your readers will now be able to rate your blog straight from your Blogger feed.

Outbrain Troubleshooting Tips for Blogger Installation
  • When you install Outbrain on your blog resist the temptation to rate one of your posts as this vote can't be deleted once it is cast. Even when I tried uninstalling and reinstalling the widget the vote did not clear.
  • The Popular Posts feature takes a while to show any posts as it needs at least 2 visits before it will start rating the post
  • If you have other problems with Outbrain try this active Outbrain support forum for answers

In this tutorial you have learned how to install the Outbrain Ratings widget on your Blogger Blogspot blog and customize it. Also some of the benefits of the Outbrain widget were discussed along with a couple of Outbrain installation troubleshooting tips. If you have a moment let me know how you get on installing this widget. Don't forget to bookmark this post for easy reference.

Guide to Blogger Blogspot FAQs

Guide to Blogger Blogspot FAQs. When you are looking for help with Blogger Blogspot you want to get that help as fast as possible that's why I have created a list of the most commonly asked questions by visitors to my blog. Use this post as a ready resource for all your frequently asked questions about blogging using the Blogger Blogspot blogging platform.

Banners and Advertising
Building Site Traffic
Common Blogger Problems Fixes
Customize Blogger
Gadgetize Blogger
Google Adsense
Monetize Blogger
Posting and Commenting
Publicize Blogger
Search Engine Optimisation
Social Media
Tracking Site Visitors


Banners and Advertising FAQ
Where can I post a banner on Blogger Blogspot?
It is possible to add an affiliate banner to Blogger in a number of places. You can add a banner to the Blogger, above the header, above the first post, within a post, below a post, in a sidebar, and in a footer.

How do I place an advertising banner in a Blogger header?
Add an Affiliate Banner to the Blogger Header

How do I place an advertising banner in a Blogger sidebar?
Add an Affiliate Banner to Blogger Sidebar

How do I place an advertising banner above the Blogger header?
Add Google Adsense or banner above the Blogger header


Build Site Traffic
How do I encourage more visitors to my blog?
Find 10 hot tips to help you get visitors to your Blogger Blogspot blog
10 Tips to Build Traffic to a Blogspot Blog

Why do I need to add my blog to blog directories?
It is not essential to add your Blogger blog to blog direcories but it is a good idea since they are a valuable link and a ready source of traffic for your blog and Submit a Blogger Blog to Blog Directories

What blog directories should I add my blog to?
There are many blog directories on the net and more springing up all the time. For some recommended blog directories check out this article:
Submit a Blogger Blog to Blog Directories


Common Blogger Problem Fixes
How do I remove the navbar from Blogger?
You can't actually remove the Blogger navbar but there is a trick to hide it.
Hide Remove Blogger Navbar

How do I reinstate a deleted Blogger navbar?
I am often asked how to fix a deleted Blogger navbar. Find the solution in:
Hide Remove Blogger Navbar

How do I fix the missing comments form below posts?
Many custom templates were created prior to Blogger embedding the comments form below posts. For details on how to upgrade your Blogger template to include an embedded comments form below posts on the single post page please refer to:
Add Missing Embedded Comments Form to Blogger

How do I fix the missing add a gadget in the layout screen?
If you can no longer see Add a Gadget in Layout > Page Elements then there is very likely a problem with your browser cache. Check out:
Missing Add a Gadget Solution in Blogger


Customize Blogger
How do I add categories to Blogger?
Blogger doesn't have categories only labels. If you want to add a categories section you can using a linked list but you will need to update it manually.
Add a Categories Section to Blogger

How do I add a list of recent posts to Blogger?
By making use of your blog's feed you can display the 5 most recent posts on your blog.
Add a Recent Posts Feed to Blogger

How do I display a list of recent comments on Blogger?
By making use of your blog's feed you can display the 5 most recent comments on your blog.
Add a Recent Comments Feed to Blogger


Gadgetize Blogger
How do I add a Live Traffic feed to my blogger Blogspot blog?
If you insert a free live traffic feed like Feedjit on your blog you will be able to watch visitors arrive at your blog in real time and gather information about where they came from, where they exited to, eearch engine keywords and keyword phrases used to access your blog.
Add Feedjit Live Traffic Feed to Blogger

How do I add a ratings widget to Blogger?
If you've seen star ratings on blogs you've visited lately and you would like to add one to your blog check out my article on the Outbrain ratings widget:
Add Outbrain Ratings Widget to Blogger

How do I add a bookmarking button to my blog?
Your visitors can share your posts with friends and add an online bookmark with an Add This Social Bookmarking button
Add a Social Bookmarking Button to Blogger

How can visitors subscribe to my blog?
You can encourage readers to sign up to regular updates of your blog by adding a subscribe button or link to your blog.
Add an Email Subscription Form and Links to Blogger Blogspot Blog


Google Adsense FAQ
Can I put Google Adsense on my Blogger Blogspot blog?
Yes you most certainly can. Unlike other online blogging platforms like Wordpress Blogger permits Blogger publishers to add Google Adsense to any Blogger blog. However be aware that spam blogs - that is blogs specifically set up to make money from Google Adsense are prohibited by Blogger.

How much money can I make from Google Adsense?
If your blog receives enough traffic (75+ visitors per day) you will be well placed to earn revenue from your Blogger Blogspot blog. Want to know more refer to:
Google Adsense Myths for Blogger Blogs

How Many Google Adsense Ad Units Can I Place on a Blogger Blog?
Google allows 3 content ads, 3 link ads and 2 search boxes on any given page. These rules are subject to change so if in doubt check Google Adsense FAQ.

How do I add Google Adsense to Blogger?
You will find many tips on the basics of adding Google Adsense to Blogger in this article:
Google Adsense Tips for Blogger

Where should I place Google Adsense on Blogger?
Better Placement of Google Adsense on Blogger
Blogger Guide to Google Adsense Placement


Monetize Blogger
How do I add a donate button?
Adding a Paypal donate button to a Blogger Blogspot blog will encourage satisfied visitors to say thanks.
Add a Paypal Donate Button to Blogger

How do I make money from my Blogger blog?
5 Easy Ways to Make Money from a Blogger blog


Posting and Commenting in Blogger
Why do the links to my post titles get shortened?
When you publish an article in Blogger a permalink gets created. If the title of your post is longer than about 35-40 characters Blogger shortens it. Check out this article for ideas on how to work around this issue
How to Create Search Engine Friendly Permalinks

How do I post date my posts?
Blogger allows publishers to post date their posts. Read the following article to find out more about how to set a future publishing date for a post
Choose Your Own Blogger Post Date

How do I date my posts with a date that has already passed?
Blogger will let you set a date for a post in the past, present or future. Find out more by reading the following article:
Choose Your Own Blogger Post Date


Publicize Blogger
Why is it important to burn my Blogger feed?
there are quite a few reasons reasons why it is a good idea to burn your Blogger Blogspot feed at Feedburner check out this article to find out more:
Blogger RSS Feeds and Feedburner

How do I burn my Blogger feed at Feedburner?
If you would like to burn your Blogger feed at Feedburner to build readership of your blog then this indepth article will show you how:
Burn Blogger RSS Feeds at Feedburner

How do I add a FeedFlare to a Blogger feed?
Not only will a Feedburner FeedFlare encourage your visitors to share your posts on various social media sites it will also copyright your material if you add this notice to the bottom of your posts. Learn more about Feedburner FeedFlares:
Add a Feedburner FeedFlare to a Blogger Feed


Search Engine Optimization
How do I get my Blogger Blogspot blog listed by major search engines?
If you wait for search engines to crawl your blog it may take a long time to appear in search engine results. You can speed up this process by submitting your blog and a sitemap to major search engines. Find out more:
Add Your Blog to Major Search Engines

How do I get listed by Yahoo?
For instructions on how to let Yahoo know about your blog and add a Blogger sitemap to Yahoo follow this guide:
Submit Your Blogspot Blog to Yahoo


Social Media
How do I add bookmarking button to my blog?
There are a number of ways to add social media to your blog. One easy way is add an all in one social bookmarking button by Add This.
Add a Social Bookmarking Button to Blogger

How do I add Twitter Links to Blogger?
How to Add a Twitter badge to Blogger
How to Add a Twitter Followers Counter to Blogger


Tracking Site Visitors
How do I know who is viewing my Blogger Blogspot blog?
There are a number of programs that can help you track visitors to your blog. One of the best, Google Analytics is provided free by Google. For more about Adding Google Analytics to a Blogger Blog

What gadget lets me watch visitors as they arrive?
If you want to see visitors arrive at your Blogger Blogspot blog you can put a free Feedjit live traffic feed widget on your Blogger sidebar.
Add Feedjit Live Traffic Feed to Blogger

Add Twitter Retweet Button to Blogger

Did you know that Twitter can help drive traffic to your Blogspot blog? In today's Blogger tutorial I show you how to add a free Twitter Retweet button to your Blogger posts. Adding a Tweetmeme Twitter Retweet button to Blogger will help promote your blog on Twitter in 2 ways: one by attracting new Twitter followers and two by increasing the direct traffic to your blog from Twitter.

Forget the preamble and take me straight to the instructions to insert the Retweet button into Blogger

What is Twitter and How Does it Work?
Twitter is currently the fastest growing free social networking site. Essentially, Twitter users micro blog about what they are doing or what others are doing by posting tweets of around 140 characters to Twitter. When Twitter members read these tweets and like what they read they can become followers much in the same way that your readers can choose to follow your blog.

Twitter is great news for bloggers because it can be used as a vehicle to promote blogs. Blogger can easily be linked with Twitter services so that every time a post is made to Blogger a short message with a link is posted on Twitter. As every follower is notified that you have tweeted, a blog publisher can gain lots of exposure for their blog with very little effort.

Once you add Tweetmeme retweets to the mix the spread compounds because not only do you have followers hearing about your tweet but the followers of followers. So say one of your followers retweets your post all that person's followers hear about it too and pretty soon a tweet plus your retweets can popularize a post to the point that it spreads so widely that it goes viral.

Advantages of a Twitter Retweet Button
A Tweet/Retweet button looks similar to and behaves like an integrated Digg button but it counts retweets rather than diggs. A Retweet button counts reposts of a tweet so that readers can see at a glance how popular your article is on Twitter. Another benefit of the Retweet button is that it allows your blog readers to retweet your post so that their followers hear about your post too.

How to Add a Twitter Retweet Button to a Blogger Blog (Blogspot Blog)
The following instructions will place a Tweetmeme Retweet button into all of your blog posts.

  1. Login to Blogger if not already logged in
  2. From the Dashboard navigate to Layout > Edit HTML
  3. Check the Expand Widget Templates button
  4. Back up your Blogger template by clicking on Download Full Template as a precaution
  5. Using CTRL + F find the following code:

    <div class='post-header-line-1'/>
  6. Directly after the above line paste the following code depending on which Retweet button and position you prefer:

      Large Retweet Button - Right Aligned
      Retweet Button
      <div style="float:right;padding:4px;">
      <script type="text/javascript">
      tweetmeme_url = '<data:post.url/>'; 
      tweetmeme_source = 'your_twitter_user_name';
      </script>
      <script type="text/javascript" src="http://tweetmeme.com/i/scripts/button.js">
      </script> </div>


    • Large Retweet Button - Left Aligned
      Retweet Button
      <div style="float:left;padding:4px;">
      <script type="text/javascript">
      tweetmeme_url = '<data:post.url/>'; 
      tweetmeme_source = 'your_twitter_user_name';
      </script>
      <script type="text/javascript" src="http://tweetmeme.com/i/scripts/button.js">
      </script> </div>

    • Compact Retweet Button - Right Aligned
      Retweet Compact Button - How to add to Blogger
      <div style="float:right;padding:4px;">
      <script type="text/javascript">
      tweetmeme_style = 'compact'; 
      tweetmeme_url = '<data:post.url/>'; 
      tweetmeme_source = 'your_twitter_user_name';
      </script>
      <script type="text/javascript" src="http://tweetmeme.com/i/scripts/button.js">
      </script> </div>

    • Compact Retweet Button - Left Aligned
      Retweet Compact Button - How to add to Blogger
      <div style="float:left;padding:4px;">
      <script type="text/javascript">
      tweetmeme_style = 'compact'; 
      tweetmeme_url = '<data:post.url/>'; 
      tweetmeme_source = 'your_twitter_user_name';
      </script>
      <script type="text/javascript" src="http://tweetmeme.com/i/scripts/button.js">
      </script> </div>
  7. Change your_twitter_user_name for your actual Twitter username. For instance I would enter BlogWizz
  8. Click on Save Template
  9. Click on View blog to admire your Tweetmeme Retweet button in your Blogger posts

Tips and Troubleshooting
  • To Add Retweet Button Below Blogger Post
    If you want the button to appear at the bottom of Blogger posts instead of just below the post title locate the first instance of the following code and then paste the code for your chosen button immediately after this line: (don't forget to change your Twitter username as in Step 7)

    <data:post.body/>
  • To Have the Retweet Button Appear on Post Pages Only in Blogger
    If you want the button to only appear on the post pages and not the home page you will need to enclose the button code in an if statement. See below for an example of what the full code would look like with this extra code.

    <b:if cond='data:blog.pageType == "item"'>
    </b:if>

    Thus the full code for a right-aligned large Retweet button which only appears on the individual post pages and not the home page would be:

    <b:if cond='data:blog.pageType == "item"'>
    <div style="float:right;padding:4px;">
    <script type="text/javascript">
    tweetmeme_url = '<data:post.url/>'; 
    tweetmeme_source = 'your_twitter_user_name';
    </script>
    <script type="text/javascript" src="http://tweetmeme.com/i/scripts/button.js">
    </script> </div>
    </b:if>

In this tutorial you have learned how to add a Tweetmeme Retweet Button to your Blogger posts. The Retweet button will encourage your blog readers to retweet your content on Twitter thereby increasing your blog traffic. I have provided the code for both a large and compact button with the option of left or right alignment. The button appears just below the post title and counts the number of retweets of your Blogger post. I have also included details of how to add the Tweetmeme Retweet button to the foot of your Blogger blog and how to add the button to post pages only.

Solution to Missing Add a Gadget Feature in Blogger

If you are experiencing problems with the Add a Gadget feature not showing up in the Layout Screen of your Blogger Blogspot blog then read on as I have found the solution to this annoying problem.

The other day I discovered to my horror I had lost the option to Add a Gadget in the layout screen of all my blogs in Blogger. Typically it couldn't have happened at a worse time as I had just planned to sit down to write some new posts. I looked in the Blogger help section for the solution but could find no reference to the problem. I eventually found the answer, after about 15 minutes, buried in the Blogger Help Group section. I thought I would therefore post a short tip for anyone out there looking for a quick answer to the loss of the Add a Gadget function from the Layout Screen.

Clear Your Browser's Cache
When the Add a Gadget feature is missing from you Layout screen and you have tried refreshing it probably means you need to clear the cache of your browser. In Internet Explorer 6 you would go to the Tools menu and choose Internet Options from the drop down menu. In the dialog box that appears select the General tab and then click on the Delete Files from the Temporary Internet Files Section (middle). Once done close the dialog box and refresh the Layout Screen in Blogger. With any luck you will now be able to see the Add a Gadget option once again. For other browsers follow the directions in the browser's help section on clearing the cache or check out Bloggers Help Article about clearing cache.

Thanks to the Blog Doctor for this solution. You really saved the day!

A short tip on how to fix the problem of add a gadget missing from the layout screen in Blogger.

Hide Remove Navbar from a Blogger Blog

The more professional you want your site to look the more you are likely to want to remove the navbar from showing above the header of your Blogger Blogspot blog. Removing or actually hiding the navbar is very easy to do as it only requires a small tweak to your template. This tutorial is suitable for bloggers at all levels but is written with new bloggers and the beginner blogger in mind and provides step by step instructions to guide you through the process of hiding the navbar from your Blogger blog.

How Useful is the Navbar of a Blogger Blog?
Blogger provides the facility to search your blog by entering keywords or a search phrase into the Search Blog box. This is a useful feature and if you remove the Blogger navbar you will lose the search facility from your blog. If you are using a custom template with a search box already built in this won't be a problem but if you are using one of the Blogger templates deleting the navbar will leave your blog without a search function. Another useful feature of the navbar is the follow button which encourages bloggers to start following your blog.

The random blog feature is not particularly useful unless you have a lot of time on your hands and just feel like a browse. For most serious bloggers looking to create a professional look and feel to their blog the navbar can be a distraction. And let's face it you've worked hard enough getting the traffic to your site right? without encouraging them to leave it too quickly.

Blogger Navbar
The other main feature of the navbar is the ability to navigate back to your layout menu or posts quickly no matter where you are in your blog when signed in. Personally I like this feature and use it a lot. Its particularly good if you are on a page other than your homepage and want to quickly go to another of your blogs as you can get there in 2 clicks. The same goes if you want to visit some other area of your Google account such as Google Analytics or Google Webmaster Tools. You can get there in 2 clicks too when the navbar is enabled.

UPDATE October 10, 2009: Blogger have now created another reason to think twice before you remove the Blogger Navbar as they have recently added a Share button so that readers can quickly add your blog to their Twitter, Facebook and Google Reader accounts. The facility to Email your posts is also available when using the Blogger Share button from an individual post page.

To navigate with the navbar disabled you simply have to double click the back button in your browser to navigate away from the home page of your blog. If you are in another part of your blog then it can be annoying not to have the navbar functionality. The way I have gotten around it is to usually disable the navbar and click on blogger.com in the google search box on the toolbar of my browser. Provided I am signed in to Blogger this will take me straight to the dashboard.

Overall my view is that what you lose on convenience you gain on professionalism. Losing the navbar is a sacrifice but it is a small price to pay for a much improved look to your blog.


How to Get Rid of the Navbar on your Blogger Blog

1. Login to Blogger and navigate to Layout > Edit HTML

2. Find the Template Credit Section

3. Insert the following code directly below the template credit section. Select the code and right click to copy to the clipboard of your computer. Right click to paste into your template:

#navbar {
height: 0px;
visibility: hidden;
display: none;
}

Edit Template to Disable Blogger Navbar

4. Click on the Save Template button

5. Click on View Blog to view you blog without the navbar

Blog Know How with Navbar disabled

Troubleshooting
If you later decide that you are not happy with the missing navbar all you need do to reinstate it is to remove the code you inserted. This works as the code you inserted actually only masks the navbar rather than deletes it.

In this tutorial you have learned about some of the advantages and disadvantages of the Blogger navbar and how to hide, disable, remove or delete the navbar in order to promote a more professional looking blog.

Add Missing Embedded Comments Form to Blogger

Today I will show you how to fix your Blogger template if the embedded comments feature is missing or not working. I decided to write this article because I have noticed that the embed a comment below the post feature is often not working in many Blogger custom templates available for download. This is usually because many of these templates were released prior to Blogger enabling embedded comments.

If you have downloaded a custom template that has embed a comment missing then read on as I will show you how to insert the code for embed a comment form into your template. Inserting code into a blog template can be challenging for some but if you follow these instructions it is not beyond even virtual beginners.

1. Login to Blogger if you are not already logged in

2. Navigate to Settings > Comments. Under Comment Form Placement make sure the Embedded below Post radio button is set. Save any changes you make.

In Blogger Settings Comments Set Comments to Embedded

3. Navigate to Layout > Edit HTML

4. I strongly recommend you back up your template by downloading it to your computer before proceeding

4. Check Expand Widget Templates

5. Use CTRL + F to bring up the Blogger Toolbar

6. Look for the following code block by entering <span class='paging-control-container'> into the find box on the toolbar. Note if you don't have this code look at the alternative option below #7 in this post

<b:if cond='data:post.commentPagingRequired'>
<span class='paging-control-container'>
<a expr:class='data:post.oldLinkClass' expr:href='data:post.oldestLinkUrl'>
<data:post.oldestLinkText/>
</a>
<a expr:class='data:post.oldLinkClass' expr:href='data:post.olderLinkUrl'>
<data:post.olderLinkText/>
</a>

<data:post.commentRangeText/>

<a expr:class='data:post.newLinkClass' expr:href='data:post.newerLinkUrl'>
<data:post.newerLinkText/>
</a>
<a expr:class='data:post.newLinkClass' expr:href='data:post.newestLinkUrl'>
<data:post.newestLinkText/>
</a>
</span>
</b:if>


7. Paste the following code into your template immediately after the code block above and before this line of code <div id='backlinks-container'>

<p class='comment-footer'>
<b:if cond='data:post.embedCommentForm'>
<b:if cond='data:post.allowNewComments'>
<b:include data='post' name='comment-form'/>
<b:else/>
<data:post.noNewCommentsText/>
</b:if>
<b:else/>
<b:if cond='data:post.allowComments'>
<a expr:href='data:post.addCommentUrl' expr:onclick='data:post.addCommentOnclick'><data:postCommentMsg/></a>
</b:if>
</b:if>
</p>
</b:if>

Enter the Embed Comments Form into Blogger Template
Alternative Option
If you don't have the code as mentioned in #6 you will likely have the following:

<p class='comment-footer'>
<b:if cond='data:post.allowComments'>
<a expr:href='data:post.addCommentUrl' expr:onclick='data:post.addCommentOnclick'><data:postCommentMsg/></a> </p>
</b:if>

In which case replace with this code:

<p class='comment-footer'>
<b:if cond='data:post.embedCommentForm'>
<b:if cond='data:post.allowNewComments'>
<b:include data='post' name='comment-form'/>
<b:else/>
<data:post.noNewCommentsText/>
</b:if>
<b:else/>
<b:if cond='data:post.allowComments'>
<a expr:href='data:post.addCommentUrl' expr:onclick='data:post.addCommentOnclick'><data:postCommentMsg/></a>
</b:if>
</b:if>
</p>
</b:if>

8. Click on the Save Template button to save your template changes

9. Click on the View Blog link and test your embed comment feature by clicking on the number of comments link found at the bottom of each post. Notice that the post will now be displayed along with the embed a comment form below the post


Troubleshooting
As there are many variations amongst templates neither of these options may work in which case try this solution from Blogger Buster:

Find: <b:include data='post' name='comments' />

Immediately below this line add the following line:
<b:include data='post' name='comment-form'/>


In this tutorial I have shown you how to add the embed comments form into your custom Blogger template if it is missing so that visitors can comment easily.

How To Delete a Blogger Blogspot Blog

I notice I get a lot of traffic to my blog from Blogger Blogspot webmasters searching for tutorials on how to delete their blog so this has prompted me to write this post about deleting a Blogger blog. As most of us are trying to get our blogs up and running this post may not be very useful for you right now however you may have occasion in the future to want to delete a blog so read on in case the day comes when you need to know what you do.

Why Might I Want to Delete a Blogger Blogspot Blog?
There a variety of reasons why you might decide to delete your blog. Here are some common ones:

You have set up a test blog and have now finished with it

You are unhappy with the name you have chosen for your blog and wish to change it. Please note you can change the name of your Blogger blogspot.com subdomain for another subdomain name provided the address is available on Blogger. Or you can change to a custom .com domain name and have Blogger redirect your blog traffic to your new address. You may want to consider these options first before proceeding with deletion)

You have tried blogging and it is not for you and you want to get rid of your blog all together

How to Delete a Blogger Blogspot Blog
1. Login to Blogger if you are not already logged in

2. From the Dashboard select the blog you wish to delete. Make sure you are in the right place if you have more than one blog

3. Navigate to Settings > Basic

4. If you think you may want to come back to your blog at a later date you can use the export tool to export your blog before you delete it. To export your blog click on Export Blog in the Blog Tools menu. If you aren't interested in exporting a copy of your blog to your home computer skip this step

blogger Basic Settings Configuration - Eport Blog - Delete Blog
5. Under the first heading Blog Tools click on the Delete Blog link

6. You will be taken to the Delete Blog screen in Blogger. Check again you have the right blog displayed by checking the name which should appear just above the row of menu tabs.

7. A warning message like the one pictured below will be displaying:

How to Delete a Blogger Blog

8. If you wish to proceed with the deletion then click on the Delete This Blog button

9. You will now be returned to the Dashboard. Notice that your blog is no longer displayed in the list of blogs. If you wish to view your deleted blog you can click on the Show All link at the bottom of the Manage Blogs list in the Dashboard

10. You will now be able to see your deleted blog including details of its deletion date. Follow the link provided to undelete this blog. Blogger allows you 90 days grace.

In this tutorial we have covered some basic reasons why you might want to delete a blog and the steps involved in actually deleting a Blogger Blogspot blog.

Show Date Above Blogger Post Title

Sometimes you may download a Blogger Blogspot template which does not display the date header above the post title. I recently struck a free Blogger template like this and it took some time to find the right part of the template to fix the date. Plus the answer was not as far as I could tell listed in Blogger help. So to help anyone desperately struggling to find the solution to this problem I have decided to share this information in this article.


To Display the Date Header Above Post Title

1. Log in to Blogger

2. Go to Layout > Edit HTML

3. Back up your template before attempting any changes

4. Type the following into the search box (CTRL + F) to find the block of code beginning with this line:

<data:adStart/>

5. Paste the following lines of code

<b:if cond='data:post.dateHeader'>
<h2 class='date-header'><data:post.dateHeader/></h2>
</b:if>

into the code block as shown here:

<data:adStart/>
<b:loop values='data:posts' var='post'>
<b:if cond='data:post.dateHeader'>
<h2 class='date-header'><data:post.dateHeader/></h2>
</b:if>

<b:include data='post' name='post'/>
<b:if cond='data:blog.pageType == "item"'>
<b:include data='post' name='comments'/>
</b:if>
<b:if cond='data:post.includeAd'>
<data:adEnd/>
<data:adCode/>
<data:adStart/>
</b:if>
<b:if cond='data:post.trackLatency'>
<data:post.latencyJs/>
</b:if>
</b:loop>
<data:adEnd/>
</div>

7. Click the Save Template button

8. View Blog to see the date above the header


Today's Blogger Blogspot tip has shown you how to add the date above the post title on a Blogger Blogspot blog. The date above the post is often missing among slightly older Blogger templates but thankfully the fix is fairly easy.

ow to Add Missing Quick Edit Wrench to Blogger

Sunday, July 20, 2014

In this Blogger tutorial (Blogspot tutorial) I show you how to add a quick edit wrench to Blogger if it is missing from a Blogger gadget. Check here to find a solution for a missing quick edit pencil not showing in Blogger

The quick edit feature allows you to edit a Blogger gadget directly from the blog itself rather than having to go through the Design > Page Elements screens and then finding the actual widget itself before you can edit it.

Heaps of times I have downloaded custom Blogger templates only to find that there are lots of omissions compared to a default Blogger template. If you are using a custom Blogger template with the quick edit feature missing here is a step by step guide to insert the missing quick edit feature into your Blogger template

The quick edit can be missing from anywhere in your Blogger template. I have chosen to use the sidebar for this tutorial but the solution works wherever the quick edit feature has been removed or never inserted in the first place.

Tutorial Difficulty rating: Easy
Time: Less than 5 minutes
Suitable for all levels of Blogger expertise

How to Add the Quick Edit Wrench to a Blogger Gadget

  1. Login to Blogger
  2. Go to Design > Edit HTML
  3. Check the Expand Widget Templates box
  4. Using CTRL + F buttons together bring up the search box
  5. Enter the following search term

    </b:includable>

  6. Scroll through your Blogger template. You will see that every instance of </b:includable> is highlighted in yellow.
  7. Once you come to the sidebar widgets which is the most likely place for the quick edit to be missing from look for something like the following (this will vary from template to template). This is the start of the first sidebar if you had a template with a two column sidebar

    <b:section class='sidebar' id='sidebar1' preferred='yes'>
  8. Now look at the picture below. You can see that this is the code for a Javascript/HTML widget as shown in red


  9. Just identify the widget that has the missing quick edit feature and add the following line of code immediately before the </b:includable>

    <b:include name='quickedit'/>


  10. Use the Preview button to check your changes before committing to them
  11. Don't forget to click on Save Template

In this Blogger tutorial (Blogspot tutorial) you have learned how to fix a missing quick edit button often missing from custom Blogger templates. No matter where the quick edit button has been omitted (sidebar, footer, header etc) it can be added in to a Blogger template very easily so that a Blogger gadget can be edited without having to go through the Blogger design screen.

How to Fix Missing Quick Edit Pencil in Blogger Blogspot

Is your custom Blogger template missing its quick edit pencil at the bottom of your Blogger posts (Blogspot posts)? Don't worry. In this Blogger tutorial I discuss how to show a quick edit pencil icon beneath Blogger posts if it is missing. This is a common Blogger problem among custom Blogger templates but fortunately it only takes a couple of minutes to fix.

This Blogger tutorial follows on from my previous Blogspot tutorial about fixing missing Blogger icons. Check out how to show quick edit gadget wrench in Blogger (Blogspot) for help with this issue.

In my previous Blogger tutorials I have also discussed how to fix many other common Blogger problems eg how to fix a missing embedded comment form in Blogger. Take a look at all my Blogger tutorials on how to fix common Blogger problems (Blogspot problems) here

Fix Missing Quick Edit Pencil Blogger Blogspot
The quick edit pencil is a nice Blogger feature that you would not want to be without. A click on this time saving Blogger icon gives you direct access to your Blogger posts without having to go through "Edit Posts"

So if the free custom Blogger template you downloaded from the internet has no quick edit pencil displaying under your Blogger posts when viewing the actual published post then it can be fixed by taking the following the steps below:

  1. Login to Blogger
  2. Go to your Design > Page Elements
  3. Click on the Blog Posts edit button located in the bottom right hand corner of the widget

  4. A Configure Blog Posts window will pop up displaying a number of different features that can be turned on and off on your blog posts.
  5. Make sure that Show Quick Edit is checked. Tick the box and save if Show Quick Edit is not already checked


  6. Now navigate to an actual published post and check whether the quick edit pencil is now displaying in or around the footer of your blog post. Remember that you must be logged into Blogger to see the quick edit pencil - it is not displayed to your visitors

    If the pencil is there then that is the end of this Blogger tutorial. The pencil just needed to be enabled. So thank you for joining me today and if you have any other issues with Blogger be sure to check out my how to fix common problems in Blogger tutorials or take a look at the list of all the Blog Know How Blogger tutorials

    If the Blogger quick edit pencil is still missing it means that some important code has been omitted from your Blogger template and it will need to be added to get the quick edit pencil to show up
  7. Go to Design > Edit HTML
  8. Back up your template
  9. Check the Expand Widget Templates box by placing a tick in it
  10. Find the following line of code by holding down the CTRL key and F at the same time:

    <b:includable id='postQuickEdit' var='post'>

  11. Check whether the following code is under it:

    <span class='post-icons'>
    <!-- email post links -->
    <b:if cond='data:post.emailPostUrl'>
    <span class='item-action'>
    <a expr:href='data:post.emailPostUrl' expr:title='data:top.emailPostMsg'>
    <img alt='' class='icon-action' height='13' src='http://img1.blogblog.com/img/icon18_email.gif' width='18'/>
    </a>
    </span>
    </b:if>

    <!-- quickedit pencil -->
    <b:include data='post' name='postQuickEdit'/>
    </span> </div>
  12. If part or all of the code is missing copy and paste it above :

    <!-- quickedit pencil -->
    <b:include data='post' name='postQuickEdit'/>

  13. Save changes to your Blogger template
  14. Go to an individual published post page and see your new quick edit pencil displayed under your Blogger post


Tips and Troubleshooting
If you want to change the Blogger quick pencil icon you can by changing the image. Simply replace the image as depicted in red with the URL address of your own image. If your image is a different size you may have to change the width and height as shown in blue for the image to display correctly

<span class='post-icons'>
<!-- email post links -->
<b:if cond='data:post.emailPostUrl'>
<span class='item-action'>
<a expr:href='data:post.emailPostUrl' expr:title='data:top.emailPostMsg'>
<img alt='' class='icon-action' height='13' src='http://img1.blogblog.com/img/icon18_email.gif' width='18'/>
</a>
</span>
</b:if>

<!-- quickedit pencil -->
<b:include data='post' name='postQuickEdit'/>
</span> </div>


In this Blogger tutorial (Blogspot tutorial) I have shown you how to fix a missing Blogger quick edit pencil that is not showing. I have demonstrated how to enable the quick edit pencil in Blogger via Page Elements and I have provided you with the missing code in the event that the quick edit pencil code is missing from your custom Blogger template.

Please let me know if this tutorial has been useful for you by leaving your comments and opinions below.

Add a Social Bookmarking Button to Blogger

In this tutorial you will learn how to add an Add This free Social Bookmarking button to your Blogger blog (Blogspot) blog. By adding this feature to your blog you will enable visitors to your blog to create links to popular social bookmarking sites such as Google, Technorati, Facebook, MySpace, Digg, Stumble Upon, Reddit, Delicious, Furl, Yahoo etc. Adding personal social bookmarks enables visitors to share these links with others thereby helping you attract more traffic to your site. For more information on the benefits of social bookmarking please refer to my article - Benefits of Social Bookmarking for Blogger bloggers.

Add This Share ButtonThis tutorial shows you how to place a social bookmarking button on your site by accessing a free social bookmark and feed button builder service called Add This. Add This will supply you with a simple piece of code which when placed in a widget will insert a social bookmarking button either at the end of each post or in the sidebar. If you wish you can add the social bookmarking button to both as I have done on this site. For those new to blogging don't worry if this sounds complicated as this article gives you step by step instructions suitable for any Blogger user including beginners.

How does an Add This Social Bookmarking Button Work?
The code from Add This places a button on your site which when clicked on by a visitor to your site opens a menu of the most popular social bookmarking services. When a selection is made by a visitor eg Delicious, Yahoo, Google, Facebook, MySpace, Stumble Upon they are given the option to submit your blog to their online bookmarks. Once a visitor submits your blog to a social bookmarking service Add This can provide you with useful analytics about bookmarks, feeds and emails depending on which buttons you enable on your site. This kind of statistical information from Add This will help you gain greater understanding of your site traffic and your most popular posts.

Add This Social Bookmarking Options


Steps for Adding a Social Bookmarking Button from Add This to Your Blogger Blog

1. Register for a free account with Add This

Add This Sign Up for a Free Account Page

2. Once you supply a username, email address, password and your website address sign up is pretty much instanteous.

3. After sign up is confirmed click on Get Your Button. This will take you to the Create Your Button Page

Add This Create a Button Page

4. On the Create Your Button page you will be asked to make some selections about your social bookmarking button.

What kind of Button? Select Sharing/bookmarking button

What Look? Choose any of the six button choices. For this example I am going to select the share button

Select Add This Share Button

Where? Select on a blog

Blogger Platform? Select Blogger

At this point the information your have entered should look like the picture below:

Add This Create a Button Page

Once you have confirmed that you have entered the correct information click on the Get Your Code button and you will be taken to the Get Your Code page.

5. From the Get Your Code page you will be given the option to Preview your button. Do so if you wish or move on to Step 6.


Having generated the code for your Add This Social Bookmarking button you now need to decide where to position it on your blog. You may either place your new Social Bookmarking Button beneath each post (see below) or in a sidebar.


Instructions for Placing a Social Bookmarking Button Beneath Each Post of Your Blogger Blog

Click on Blog Post Button option.

Highlight the Javascript code supplied by Add This

Copy the code to the Clipboard of your computer using Ctrl + C command

In a new window open your Blogger Blog and sign in

Navigate to Layout > Edit HTML

As a precaution Backup your template in case you inadvertently overwrite some code.

Once you have backed up place a tick in the Expand Widget Templates checkbox

Use the Ctrl + F command to open the toolbar which will appear at the bottom of your page while using Blogger. You can close this at any time using the Ctrl + F command or by clicking on the blue cross in the lefthand corner.

Now highlight the following line of code and using the Ctrl + C command copy and paste the code into the Search Box on the toolbar at the bottom of Blogger. This action will quickly locate the code for you in your Blogger template. You will be placing the code immediately before this tag.

<div class='post-footer'>


Return to Add This and highlight the Javascript button code supplied. Copy the code to your clipboard using the Ctrl + C command.

Reopen the Blogger window and place the cursor right before the tag that you located earlier.

Paste the Javascript code from Add This into the template using the Ctrl + V command.

Your code placement should look like that pictured below

Code Placement for Free Social Bookmarking Button from Add This
Click on Save Template

Now click on View Blog from the top menu and navigate to the end of your first post. If all instructions have been followed you will now have a social bookmarking button at the bottom of each post.


Instructions for Placing a Social Bookmarking Button in a Sidebar of Your Blogger Blog

Follow the Add This automated process by clicking on Add the Menu to My Blog button. This will place an Add This social bookmarking button in a widget in your sidebar as you see on this site.

Blog Know How Sidebar Showing Add This Bookmark Button

This Blogger tutorial has covered the steps involved in adding a free Add This Social Bookmarking Button to your Blogger blog (Blogspot blog). Grow your Blogger (Blogspot) blog today by adding a free Add This social bookmarking button which will enable visitors to bookmark your site and share your posts with others. Add This will provide statistical tracking of social bookmarking activity on your site and help you determine your most popular posts.